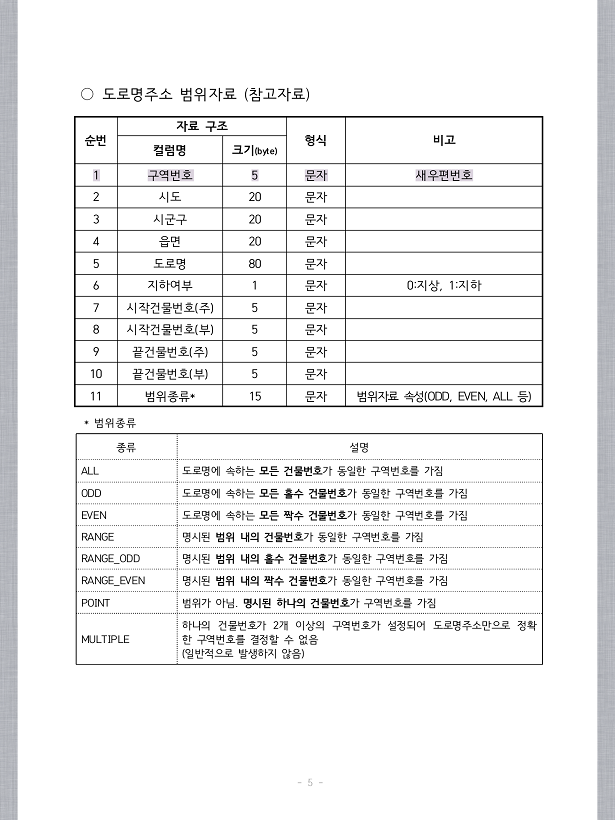
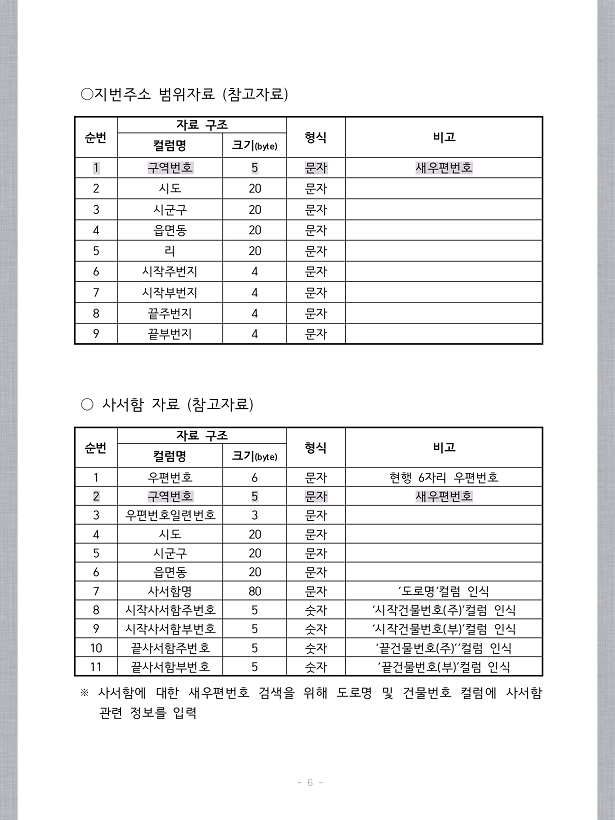
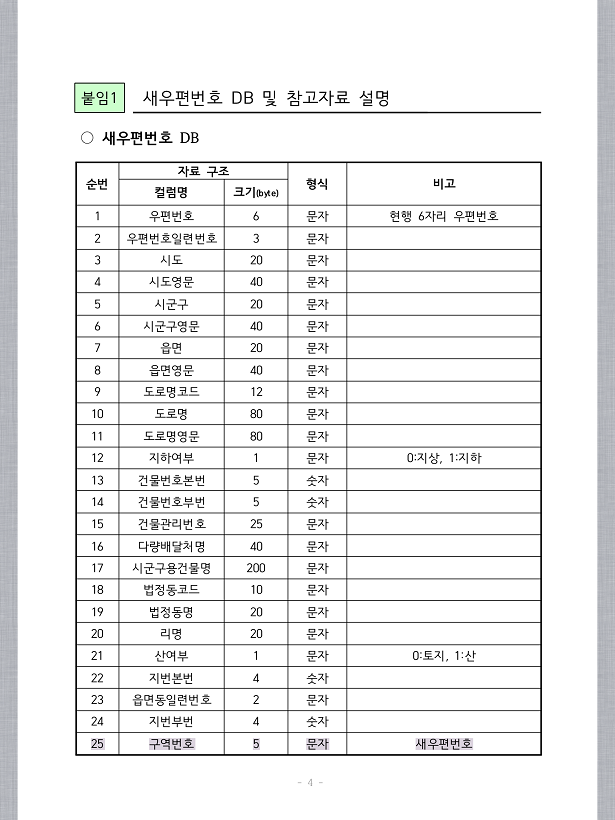
8월 새 우편번호의 필드 속성 정보

올 8월 우편번호 개편이 예정되어 있어 지난 도로명 주소때와 비슷한 혼란이 있을 것 같은 가운데.. 
새 우편번호 안내는 아래 url에서 확인 가능.
http://www.epost.go.kr/search/zipcode/cmzcd003k01.jsp 

문제는 새로운 우편버호 체계를 기존 서비스에 적용해야하는 개발자들이 관심을 가질만한 필드 속성.
무려 25개 필드가 존재...

그냥 포털에서 제공하는 주소 검색기를 쓰는게 편할까..
http://postcode.map.daum.net/guide

출처 : 우정사업본부 http://www.koreapost.go.kr
사용자 삽입 이미지
사용자 삽입 이미지
사용자 삽입 이미지


2015/05/10 12:31 2015/05/10 12:31
Trackback Address:이 글에는 트랙백을 보낼 수 없습니다

0xc000007b 오류

fix 0xc00007b error "the application was unable to start correctly"
there may be multiple reasons as to why you might receive 0xc00007b error when trying to run an application on a windows machine. 0xc000007b error usually comes from mixing up 32bit environment with 64bit one. For example 32bit application loads a 64bit dll causing 0xc000007b error.
Solution 1
In most cases it's .NET framework causing issues. This can easily fixed by re-installing latest .NET framework from [link] 
Solution 2
Re-install the application that you are trying to run. It sounds simple but the application data files could be corrupt or missing. This could be caused by a installation that did not complete successfully or by a virus.
Solution 3
Running the application as an administrator could fix this error. Right click on the program shortcut or program .exe file, then click on Properties, and on the Compatibility tab. Check the Run this program as an administrator box, and click on OK
Solution 4
Restart your computer as some applications require restart after installation to function properly.
Solution 5
Run Windows update as it can provide application fixes and updates. Furthermore it installs missing drivers and updates the outdated ones like graphic card drivers. Windows 7 / 8 / 8.1 users need to search for "windows update". select all important and optional updates and click on the "install updates" button. If you use Windows XP navigate navigate to Windows Update by choosing Start > All Programs > Windows Update. When the scan is complete,Click the Review and Install Updates link. Finally press the "install now" button.
Windows 7 / 8 / 8.1
Windows XP
Solution 6
manually update the application if possible.
Solution 7
re-install Microsoft Visual C++ from [x32 link] or [x64 link]
Solution 8
re-install DirectX [link] 
Solution 9
Many times hard disk problems can be repaired using the chkdsk command. If you are using windows 7 press the start button in bottom left corner of your screen. If you are using windows 8 / 8.1 press the windows key .Search for "cmd" and Right click it and select "Run as administrator". Windows XP users Click on start > run. In the Run box, type in "cmd" in the box.
Windows 7:
Windows 8 / 8.1
Windows XP
A CMD window should appear. In that window you can just type it as you see "chkdsk c: /f /r". If you have more then one drive or partition, you will need to tell it the disk (chkdsk d: /f /r).
If it is the primary windows disk c: it will ask you to schedule it for next boot. When you restart, it will do a chkdsk for you before even getting to the login screen.
Solution 10
This solution only works for a 64-bit system. It requires replacing files is system32 directory so be careful. Only attempt this solution if you are confident and if other solutions have failed. When Microsoft Visual C++ Redistributable Package is not properly configured it may cause 0xc00007b error. Firstly download the zip file [link] and decompress it. Reboot in safe mode and go to C:\Windows\System32. copy all files included in the zip package (mfc100.dll, mfc100u.dll, msvcr100.dll, msvcp100.dll and msvcr100_clr0400.dll) to C:\Windows\System32 replacing the current ones. After that reboot in normal mode.
If all the solutions above haven't worked i would consider backing up data and performing a clean install of windows.


http://www.mediafire.com/download/97erhoox4d3zabq/aio210.zip


2015/04/01 12:56 2015/04/01 12:56
Trackback Address:이 글에는 트랙백을 보낼 수 없습니다

느려터진 이클립스를 조금이라도 빠르게..

이클립스 사용하면 가끔 사람을 힘들게 하죠. 조금이라도 이클립스를 쾌적하게 사용하기 위한 제품이 있네요.
Optimize for Eclipse 라고 jrebel로 잘 알려진 zeroturnaround사의 제품입니다.
사실, 이런 건 먼저 체감해보고 권해드리면 더 좋겠습니다만 전 골수 넷빈즈 유저라…
대부분 이클립스 사용 개발자 분들께 도움이 될까 공유드립니다. 이런 툴을 설치한다고 해서 드라마틱한 성능 향상을 기대하는 건 아닙니다만 조금이라도 도움이 된다면 나쁘진 않겠죠. 혹, 실험정신으로 사용해 보실 분은 나중에 사용 소감을 공유해 주시면 감사하겠습니다.


아쉽게도 이 제품이 어떤 방법으로 이클립스를 빠르게 한다는 건지에 대한 설명 자료는 찾을 수가 없었습니다만 zeroturnaround사에 의하면 이클립스가 느린 이유에 대해 대략 다음의 원인을 들고 있습니다.

  1.적은 메모리 allocation.
  2.느린 class verification.
  3.거대한 index와 history 관리.
  4.낮은 버전의 JDK 사용.
  5.과거 버전의 이클립스 사용.
  6.시간을 많이 잡아먹는 build와 deploy.


설치는 이클립스 마켓플레이스를 이용하거나 플러그인 업데이트를 통해 가능합니다.
마켓플레이스 이용.
  1 help -> Eclipse Marketplace…
  2 Optimizer for Eclipse 검색.
  3 Install.
플러그인 이용.
  1 Help -> Install New Software…
  2 http://update.zeroturnaround.com/free-tools/site/  사이트 추가.
  3 플러그인 설치 완료.


다음은 이클립스 속도개선을 위한 몇 개의 팁을 소개한 article입니다.


첨부파일은 2013년 eclipsecon에서 이클립스 성능개선을 위해 어떤 일들을 했는지 소개한 문서입니다.
2015/03/12 15:12 2015/03/12 15:12
Trackback Address:이 글에는 트랙백을 보낼 수 없습니다

.properties 파일

Java에서 설정값 저장용으로 널리 쓰이는 .properties 파일은 다음과 같은 특징이 있다.

포맷
키,밸류 쌍으로 문자열을 작성하게 되며 허용하는 형식은 다음과 같다.
[code]key=value[/code][code]key = value[/code][code]key:value[/code][code]key value[/code]

공백없이 첫 문자가 number sign( # ), exclamation mark ( ! ) 로 시작하는 라인은 코맨트로 처리한다.
키에 공백을 포함하려면 escape character로 역슬래시 ( \ )를 사용한다.
다음에 몇가지 예를 참조.
[code java]
# 이 라인은 코맨트 처리되어 프로퍼티 파일 처리에 아무런 영향을 미치지 않음.
! 과 같이 느낌표로도 코맨트 라인임을 표기할 수 있음.

site = https\:/ /www.yunsobi.com
language = ko

# 역 슬래시로 계속해서 읽어들임을 표시.
message = Hello \
             World\!
# key에 공백문자를 표시하기 위해서도 역슬래스를 사용한다.
key\ with \ space = key is "key with space"

# 유니코드
tab : \u0009
[/code].properties 파일의 인코딩은 latin-1으로 알려진 ISO-8859-1 로 저장 한다. latin-1 으로 표현할 수 없는 문자인 경우 Unicode escape character를 사용하여 표기하여야 한다.
2015/03/03 10:40 2015/03/03 10:40
Trackback Address:이 글에는 트랙백을 보낼 수 없습니다

logback 로그 레벨별로 로그파일 분리하기

levelFilter를 활용.
[code xml]<appender name="infoFile" class="ch.qos.logback.core.rolling.RollingFileAppender">
  <File>${LOGS_FOLDER}/info.log</File>
  <filter class="ch.qos.logback.classic.filter.LevelFilter">
    <level>INFO</level>
    <onMatch>ACCEPT</onMatch>
    <onMismatch>DENY</onMismatch>
  </filter>
  <encoder>
    <pattern>%d{HH:mm:ss.SSS} [%thread] %-5level %logger{36} - %msg%n</pattern>
  </encoder>
</appender>
<appender name="debugFile" class="ch.qos.logback.core.rolling.RollingFileAppender">
  <File>${LOGS_FOLDER}/debug.log</File>
  <encoder>
    <pattern>%d{HH:mm:ss.SSS} [%thread] %-5level %logger{36} - %msg%n</pattern>
  </encoder>
</appender>
<root level="INFO">
  <appender-ref ref="infoFile" />
</root> <root level="DEBUG">
  <appender-ref ref="debugFile" />
</root>[/code]
2015/02/18 10:13 2015/02/18 10:13
Trackback Address:이 글에는 트랙백을 보낼 수 없습니다

Java 자동화, 매크로 도구들

Java Robot : JDK에 기본으로 포함되어있는 API.

Tasklist - http://technet.microsoft.com/en-us/library/bb491010.aspx
프로세스 정보를 출력하는 콘솔 명령어

NirCmd - http://www.nirsoft.net/utils/nircmd.html
콘솔명령도구

Open CV for JAVA - http://opencv.org/
Imgproc.matchTemplate(img1, img2, img3, Imgproc.TM_CCOEFF_NORMED); 와 같은 방식으로 이미지 비교 및 위치 검색 수행.
특정버튼을 미리 캡쳐해 놨다가 자동으로 클릭하는 기능같은 기능 개발시 유용.

JNativeHook - https://github.com/kwhat/jnativehook
자바 글로벌 후커

2015/01/16 11:14 2015/01/16 11:14
Trackback Address:이 글에는 트랙백을 보낼 수 없습니다

일반 메소드를 AOP를 통하여 멀티 쓰레드로 동작시키기

2014/10/23 09:13

서비 Tip&Tech

reference : http://springinpractice.com/2008/11/15/aop-101-speeding-up-springs-javamailsenderimpl-with-aop


Advice 작성
[code java] package app.aop;

import org.apache.log4j.Logger;
import org.aspectj.lang.ProceedingJoinPoint;

public class ForkAdvice {
private static final Logger log = Logger.getLogger(ForkAdvice.class);

public void fork(final ProceedingJoinPoint pjp) {
new Thread(new Runnable() {
public void run() {
log.info("Forking method execution: " + pjp);
try {
pjp.proceed();
} catch (Throwable t) {
// All we can do is log the error.
log.error(t);
}
}
}).start();
}
} [/code]

applicationContext 를 통해 bean 설정. ( 혹은 annotation 기반으로 위 adice 에 pointcut 지정 )
[code xml]<beans xmlns="http://www.springframework.org/schema/beans"
    xmlns:aop="http://www.springframework.org/schema/aop"
    xmlns:jee="http://www.springframework.org/schema/jee"
    xmlns:p="http://www.springframework.org/schema/p"
    xmlns:xsi="http://www.w3.org/2001/XMLSchema-instance"
    xsi:schemaLocation="http://www.springframework.org/schema/aop http://www.springframework.org/schema/aop/spring-aop-2.5.xsd
        http://www.springframework.org/schema/beans http://www.springframework.org/schema/beans/spring-beans-2.5.xsd
        http://www.springframework.org/schema/jee http://www.springframework.org/schema/jee/spring-jee-2.5.xsd>
         <jee:jndi-lookup id="mailSession" jndi-name="mail/Session" resource-ref="true"/>
         <bean id="mailSender"
        class="org.springframework.mail.javamail.JavaMailSenderImpl"
        p:session-ref="mailSession"/>
         <bean id="mailingListService"
        class="app.service.MailingListServiceImpl"
        p:mailSender-ref="mailSender"/>
             <bean id="forkAdvice" class="app.aop.ForkAdvice"/>
         <aop:config>
        <aop:aspect ref="forkAdvice">
            <aop:around method="fork" pointcut="execution(* org.springframework.mail.javamail.JavaMailSenderImpl.send(..))"/>
        </aop:aspect>
    </aop:config>
         ...
     </beans> [/code]
2014/10/23 09:13 2014/10/23 09:13
Trackback Address:이 글에는 트랙백을 보낼 수 없습니다

X-Frame-Options 와 ClickJacking

ClickJacking 과 같은 공격을 무력화 하기위해 X-Frame-Options 같은 확장 해더를 이용할 수 있다.
X-Frame-Options 을 통해 브라우저가 <frame>, <iframe> 혹은 <object> 태그를 렌더링 해야하는지 막아야하는지를 알려준다.
X-Frame-Options 은 다음 세가지 값 중 하나를 사용할 수 있다.

 DENY  해당 페이지는 frame 내에서 표시할 수 없다. 
 SAMEORIGIN  해당 페이지와 동일한 orgin에 해당하는 frame 내에서 표시를 허용한다.
 ALLOW-FROM uri  해당 페이지는 지정된 orgin에 해당하는 frame 내에서 표시할 수 있다.

각 웹서버 별 X-Frame-Options 해더를 response에 추가하기 위한 방법은 다음과 같다.
Header always append X-Frame-Options SAMEORIGIN

add_header X-Frame-Options SAMEORIGIN;

<system.webServer>
  ...
  <httpProtocol>
    <customHeaders>
      <add name="X-Frame-Options" value="SAMEORIGIN" />
    </customHeaders>
  </httpProtocol>
  ...
</system.webServer>

X-Frame-Options 는 그 명칭에서도 알 수 있듯이 확장 해더이기때문에 모든 브라우저가 해당 옵션에 대해 동작하는것은 아니다.
크롬 4.1 , IE 8 , 오페라 10.5 , 사파리 4.0 , 파이어폭스 3.6.9 이상에서는 DENY , SAMEORIGIN 이 적용되며, ALLOW-FROM 은 각 브라우저 마다 지원 현황이 다르다.
2014/09/18 11:21 2014/09/18 11:21
Trackback Address:이 글에는 트랙백을 보낼 수 없습니다

StampedLock example from java api

http://docs.oracle.com/javase/8/docs/api/java/util/concurrent/locks/StampedLock.html

[code java] class Point {
   private double x, y;
   private final StampedLock sl = new StampedLock();
   void move(double deltaX, double deltaY) { // an exclusively locked method
     long stamp = sl.writeLock();
     try {
       x += deltaX;
       y += deltaY;
     } finally {
       sl.unlockWrite(stamp);
     }
   }

   double distanceFromOrigin() { // A read-only method
     long stamp = sl.tryOptimisticRead();
     double currentX = x, currentY = y;
     if (!sl.validate(stamp)) {
        stamp = sl.readLock();
        try {
          currentX = x;
          currentY = y;
        } finally {
           sl.unlockRead(stamp);
        }
     }
     return Math.sqrt(currentX * currentX + currentY * currentY);
   }

   void moveIfAtOrigin(double newX, double newY) { // upgrade
     // Could instead start with optimistic, not read mode
     long stamp = sl.readLock();
     try {
       while (x == 0.0 && y == 0.0) {
         long ws = sl.tryConvertToWriteLock(stamp);
         if (ws != 0L) {
           stamp = ws;
           x = newX;
           y = newY;
           break;
         }
         else {
           sl.unlockRead(stamp);
           stamp = sl.writeLock();
         }
       }
     } finally {
       sl.unlock(stamp);
     }
   }
 }[/code]
2014/07/03 22:51 2014/07/03 22:51
Trackback Address:이 글에는 트랙백을 보낼 수 없습니다

replaceAll(" ","") trim() 으로 제거되지 않는 공백 제거

[code java]String str =originalString.replaceAll(" ", "");[/code] 등으로 삭제되지 않는 공백문자를 제거 해 보자.

상기 코드로 삭제되지 않는 이유는.. cjk 문자셋에서 나타나는 IDEOGRAPHIC SPACE 라 불리는 유니코드 \u3000 , HTML 표현으로는 &#12288; 문자로 폰트 지원이 없으면 눈에 보이지 않는(display 되지 않는) 코드로만 존재하는 공백이기 때문.
http://www.fileformat.info/info/unicode/char/3000/index.htm

이럴 경우 다음과 같은 정규식을 통해 제거가 가능.

모든 공백 제거
[code java]String str =originalString.replaceAll("\\p{Z}", "");[/code]

앞뒤 공백만 제거(trim)
[code java]String str =originalString.replaceAll("(^\\p{Z}+|\\p{Z}+$)", "");[/code]
2014/06/17 18:45 2014/06/17 18:45
Trackback Address:이 글에는 트랙백을 보낼 수 없습니다
  1. 좋은글 감사합니다.

    퍼가요~

  2. Blog Icon
    euna

    감사합니다. trim이 안되서 애먹고 있었는데 해결했네요. 정말 감사합니다

Spring4 - Servlet3.0 Websocket ConcurrentModificationException 익셉션 발생 시

Spring 4 에서 지원하는 @MessageMapping 어노테이션으로 구현한 WebSocket 서버 프로그램에서 Exception in thread "clientInboundChannel-5" java.util.ConcurrentModificationException 와 같은 익셉션 발생 시.
스프링 프레임워크 버전을 확인.  4.0.5 에서 해결된 문제로 이하 버전으로 개발했다면 프레임워크 업데이트로 해결 가능.
https://jira.spring.io/browse/SPR-11755
[code] Exception in thread "clientInboundChannel-5" java.util.ConcurrentModificationException at java.util.LinkedHashMap$LinkedHashIterator.nextNode(LinkedHashMap.java:711) at java.util.LinkedHashMap$LinkedKeyIterator.next(LinkedHashMap.java:734) at org.springframework.messaging.simp.broker.DefaultSubscriptionRegistry$DestinationCache.updateAfterNewSubscription(DefaultSubscriptionRegistry.java:179) at org.springframework.messaging.simp.broker.DefaultSubscriptionRegistry.addSubscriptionInternal(DefaultSubscriptionRegistry.java:91) at org.springframework.messaging.simp.broker.AbstractSubscriptionRegistry.registerSubscription(AbstractSubscriptionRegistry.java:65) at org.springframework.messaging.simp.broker.SimpleBrokerMessageHandler.handleMessageInternal(SimpleBrokerMessageHandler.java:126) at org.springframework.messaging.simp.broker.AbstractBrokerMessageHandler.handleMessage(AbstractBrokerMessageHandler.java:171) at org.springframework.messaging.support.ExecutorSubscribableChannel$1.run(ExecutorSubscribableChannel.java:70) at java.util.concurrent.ThreadPoolExecutor.runWorker(ThreadPoolExecutor.java:1142) at java.util.concurrent.ThreadPoolExecutor$Worker.run(ThreadPoolExecutor.java:617) at java.lang.Thread.run(Thread.java:745) Exception in thread "clientInboundChannel-4" java.util.ConcurrentModificationException at java.util.LinkedHashMap$LinkedHashIterator.nextNode(LinkedHashMap.java:711) at java.util.LinkedHashMap$LinkedKeyIterator.next(LinkedHashMap.java:734) at org.springframework.messaging.simp.broker.DefaultSubscriptionRegistry$DestinationCache.updateAfterRemovedSession(DefaultSubscriptionRegistry.java:214) at org.springframework.messaging.simp.broker.DefaultSubscriptionRegistry.unregisterAllSubscriptions(DefaultSubscriptionRegistry.java:112) at org.springframework.messaging.simp.broker.SimpleBrokerMessageHandler.handleMessageInternal(SimpleBrokerMessageHandler.java:136) at org.springframework.messaging.simp.broker.AbstractBrokerMessageHandler.handleMessage(AbstractBrokerMessageHandler.java:171) at org.springframework.messaging.support.ExecutorSubscribableChannel$1.run(ExecutorSubscribableChannel.java:70) at java.util.concurrent.ThreadPoolExecutor.runWorker(ThreadPoolExecutor.java:1142) at java.util.concurrent.ThreadPoolExecutor$Worker.run(ThreadPoolExecutor.java:617) at java.lang.Thread.run(Thread.java:745) [/code]
2014/06/03 15:59 2014/06/03 15:59
Trackback Address:이 글에는 트랙백을 보낼 수 없습니다

Spring3 에서 Spring4 - servlet 3.0 으로 웹어플리케이션 마이그레이션하기

기존 Spring3 기반으로 개발한 웹어플리케이션을 Servlet 3.0 , Spring 4 버전으로 마이그레이션 하는 순서는 다음과 같다.
Spring 4의 변경 신기능 소개.

1. 메이븐 형식의 프로젝트라면 POM 파일에 서블릿 3.0 스펙의 API를 사용할 수 있도록 servlet-api.jar dependancy를 업데이트
[code xml]<dependency>
<groupId>javax.servlet</groupId>
<artifactId>javax.servlet-api</artifactId>
<version>3.1.0</version>
<scope>provided</scope> <!-- 런타임시에는 서블릿 컨테이너에의해 제공되므로 provided로 설정 -->
</dependency>
[/code]

2. web.xml namespaces,xsd files 과 version 업데이트
[code xml]<web-app version="3.0" xmlns="http://java.sun.com/xml/ns/javaee"
xmlns:xsi="http://www.w3.org/2001/XMLSchema-instance"
xsi:schemaLocation="http://java.sun.com/xml/ns/javaee http://java.sun.com/xml/ns/javaee/web-app_3_0.xsd">
[/code]

3. Spring Framework 의 라이브러리 jar 들을 버전 4로 업데이트

4. 스프링 Context 설정 파일의 스키마 로케이션 정보 업데이트. 다음과 유사하게 xsi:schemaLocation 의 스키마 버전 정보를 4.0으로 변경.
[code xml]<beans xmlns="http://www.springframework.org/schema/beans"
  xmlns:aop="http://www.springframework.org/schema/aop"
  xmlns:context="http://www.springframework.org/schema/context"
  xmlns:tx="http://www.springframework.org/schema/tx"
  xmlns:xsi="http://www.w3.org/2001/XMLSchema-instance"
  xmlns:task="http://www.springframework.org/schema/task"
  xmlns:util="http://www.springframework.org/schema/util"
  xmlns:cache="http://www.springframework.org/schema/cache"
  xmlns:p="http://www.springframework.org/schema/p"
  xsi:schemaLocation="http://www.springframework.org/schema/aop http://www.springframework.org/schema/aop/spring-aop-4.0.xsd
    http://www.springframework.org/schema/beans http://www.springframework.org/schema/beans/spring-beans-4.0.xsd
    http://www.springframework.org/schema/context http://www.springframework.org/schema/context/spring-context-4.0.xsd
    http://www.springframework.org/schema/task http://www.springframework.org/schema/task/spring-task-4.0.xsd
    http://www.springframework.org/schema/util http://www.springframework.org/schema/util/spring-util-4.0.xsd
    http://www.springframework.org/schema/cache http://www.springframework.org/schema/cache/spring-cache-4.0.xsd
    http://www.springframework.org/schema/tx http://www.springframework.org/schema/tx/spring-tx-4.0.xsd">[/code]

5. Jackson 라이브러리 업데이트. 버전 1.x 의 jackson 라이브러리를 사용하고 있었다면 2점대로 변경. 이는 스프링 라이브러리에 의해 사용된다.
[code]<dependency>
<groupId>com.fasterxml.jackson.core</groupId>
<artifactId>jackson-core</artifactId>
<version>2.3.0</version>
</dependency>

<dependency>
<groupId>com.fasterxml.jackson.core</groupId>
<artifactId>jackson-databind</artifactId>
<version>2.3.0</version>
</dependency>
[/code]

6. view resolver 쪽에 jackson 매핑이 1.x 대응이라면 2.x 대응으로 변경.
1.x jackson mapper 설정이 다음과 같다면..
[code xml] <bean id="jsonMapper" class="com.fasterxml.jackson.databind.ObjectMapper" />
<bean id="jsonView" class="org.springframework.web.servlet.view.json.MappingJacksonJsonView">
<property name="objectMapper" ref="jsonMapper" />
</bean> [/code]
다음과 같이 MappingJackson2JsonView 로 변경 필요.
[code xml]<!-- Spring3 이상, jackson 라이브러리 2 이상일 때는 MappingJackson2JsonView 로 설정. -->
<bean id="jsonMapper" class="com.fasterxml.jackson.databind.ObjectMapper" />
<bean id="jsonView" class="org.springframework.web.servlet.view.json.MappingJackson2JsonView">
<property name="objectMapper" ref="jsonMapper" />
</bean>
[/code]
2014/05/28 10:14 2014/05/28 10:14
Trackback Address:이 글에는 트랙백을 보낼 수 없습니다

MSSQL 연결 문자열을 row로 변환


function으로..[code sql]
CREATE FUNCTION [dbo].[SplitToRows]
    (
        @List NVARCHAR(MAX),
        @delim VARCHAR(255)
    )
    RETURNS TABLE
    AS
        RETURN ( SELECT [Value] FROM
          (
            SELECT
              [Value] = LTRIM(RTRIM(SUBSTRING(@List, [Number],
              CHARINDEX(@delim, @List + @delim, [Number]) - [Number])))
            FROM (SELECT Number = ROW_NUMBER() OVER (ORDER BY name)
              FROM sys.all_objects) AS x
              WHERE Number <= LEN(@List)
              AND SUBSTRING(@delim + @List, [Number], LEN(@delim)) = @delim
          ) AS y
        );
[/code]

임시 테이블 방법으로...
[code sql]
DECLARE @to_convert_str nvarchar(2000)
DECLARE @delim varchar(1)
set @to_convert_str = '가나다,라마바,사아자';
set @delim = ','

;WITH converte_to_rows AS (
SELECT
  [converted_row] = LTRIM(RTRIM(SUBSTRING(@to_convert_str, [Number],
  CHARINDEX(@delim, @to_convert_str + ',', [Number]) - [Number])))
FROM (SELECT Number = ROW_NUMBER() OVER (ORDER BY name)
  FROM sys.all_objects) AS x
  WHERE Number <= LEN(@to_convert_str)
  AND SUBSTRING( ',' + @to_convert_str, [Number], LEN( @delim)) =  @delim
)

SELECT * FROM converte_to_rows
[/code]
2014/03/28 10:09 2014/03/28 10:09
Trackback Address:이 글에는 트랙백을 보낼 수 없습니다

VisualVm으로 원격 JVM 프로파일링


1. jstatd.all.policy 파일 작성
[java_home]/bin 디렉토리에 아래 내용의 jstatd.all.policy 파일을 작성한다.
[code]
grant codebase "file:${java.home}/../lib/tools.jar" {
   permission java.security.AllPermission;
};
[/code]

2. 2020 포트로 rmi 통신 준비.
rmiregistry 2020&

3. jstatd 구동
jstatd -J-Djava.security.policy=all.policy -p 2020&

4. VisualVM 실행 하여 Add Remote Host 로 원격지 정보 등록
2014/03/26 12:48 2014/03/26 12:48
Trackback Address:이 글에는 트랙백을 보낼 수 없습니다

windows 코맨드 콘솔 문자셋 변경


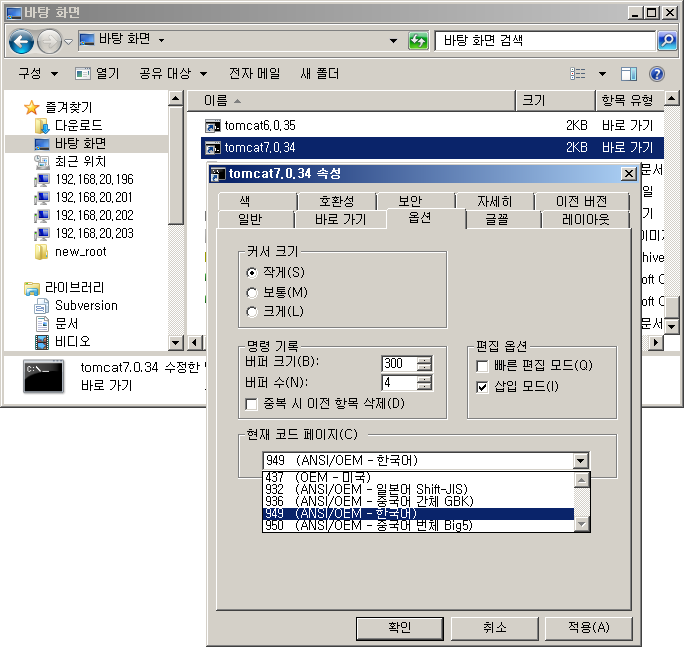
한글 윈도우를 사용하고 있다면 코맨드콘솔은 default로 한글 코드페이지 949로 지정되어 있다. 이를
UTF-8등의 다른 코드페이지로 변경하는 방법은 코맨드콘솔의 바로가기->속성에서 변경할 수 있다.
사용자 삽입 이미지


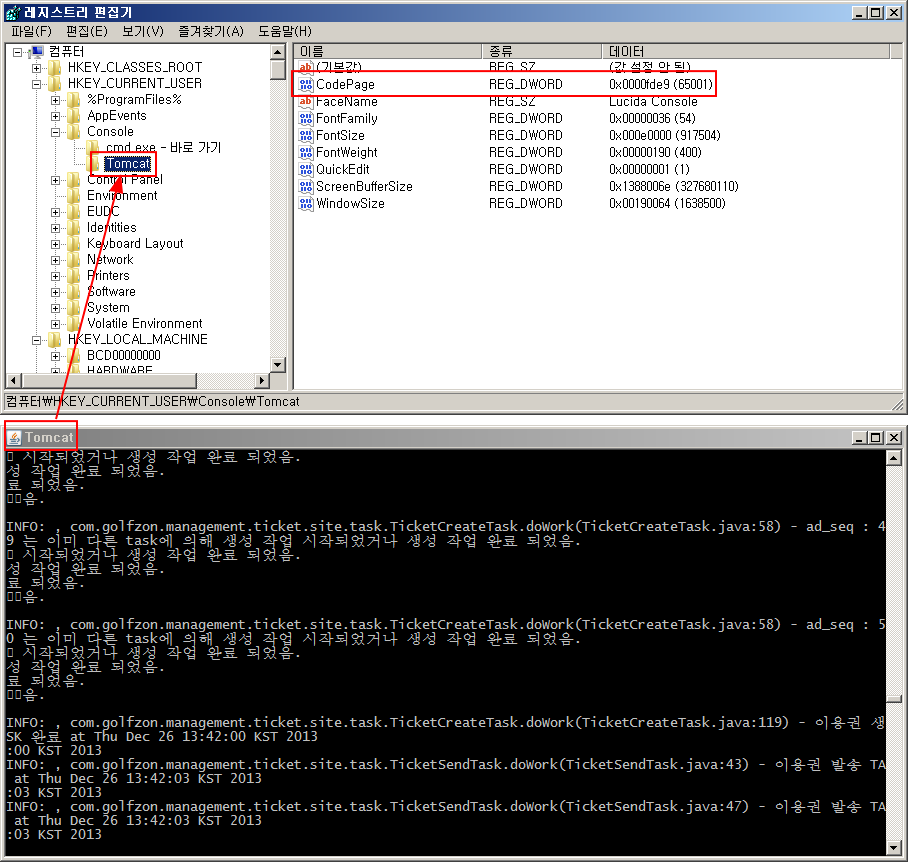
위 첨부 이미지와 같이 UTF-8등 원하는 코드 페이지가 존재하지 않을 수 있는데, 이 때는 레지스트리를 조작해서
수정할 수 있다.. HKEY_CURRENT_USER\Console\[콘솔 타이틀]

아래에 CodePage 값 편집을 통하여 출력되는 문자셋을 변경 할 수 있다.
utf-8은 코드페이지 65001.
사용자 삽입 이미지
2013/12/26 14:00 2013/12/26 14:00
Trackback Address:이 글에는 트랙백을 보낼 수 없습니다
  1. Blog Icon
    비밀방문자

    관리자만 볼 수 있는 댓글입니다.