Netbeans Dark Metal Theme

넷빈즈 룩앤필을 다크 테마로 변경했습니다. 테마명은 Dark Metal Theme 입니다.
2013년 2월경에 릴리즈가 되었는데 지금껏 그 존재를 모르고 있었네요..
기존에 있었던 어두운 계열의 룩앤필은 어딘가 한두개씩 이상했거든요..
Java에서 자랑하는 Nimbus 룩엔필도 올록볼록한게 제눈에는 영 마음에 안들구요...
다크 메탈의 경우엔 사용하는데 무리가 없는 수준으로 룩앤필이 완성되서 한동안은 이 테마를 사용할듯 합니다.

딱 한 가지만 부족한 부분을 꼽자면 에디터 영역이 아닌 기본 메뉴나 프로젝트 영역의 폰크가 백색인건데.. 메뉴 쪽 폰트만 조금 톤다운하면 좀 더 미려할텐데.. 이 부분은 룩앤필 소스를 수정해야하는것 같은데 이 룩앤필 소스 레파지토리 정보를 찾을 수가 없네요.

테마적용 후 메뉴의 font 크기가 작아졌다면 [netbena설치디렉토리]/etc/netbenas.conf 파일에서 --fontsize 12 옵션 설정.
[code xml]netbeans_default_options="-J-client -J-Xss16m -J-Xms64m -J-XX:PermSize=64m -J-Dapple.laf.useScreenMenuBar=true -J-Dapple.awt.graphics.UseQuartz=true -J-Dsun.java2d.noddraw=true -J-Dsun.java2d.dpiaware=true -J-Dsun.zip.disableMemoryMapping=true --fontsize 12 --locale UTF-8 -J-Dfile.encoding=UTF-8"[/code]

사용자 삽입 이미지

2014/09/24 16:31 2014/09/24 16:31
Trackback Address:이 글에는 트랙백을 보낼 수 없습니다

Java Blueprints web application layout 과 Jakarta web application layout의 차이

** 본 포스팅은 2006년 12월 20일 네이버 블로그에 포스팅한 내용을 백업, 내용을 보강한 것입니다. **

자바 진영에서 웹어플리케이션(jsp,servlet,jsf,struts,webwork 등을 통틀어)을 구성하는데는 크게 두가지의 표준디렉토리 레이아웃이 존재한다.
( 모든 웹 프로젝트가 표준을 따르는것은 아니며 각각의 프로젝트마다 달라질 수있다. 여기서는 두 표준이 제시하는 디렉토리 레이아웃을
살펴보고자 할 따름이다.)

하나는 SUN에서 내 놓은 JAVA Blueprint, 나머지 하나는 자카르타 프로젝트이다.
두 레이아웃의 차이는 아래 다이어그램으로 표현 할 수 있다.

java blueprint web application layout 과 jakarta web application layout의 차이


주황색으로 구분지어 놓은 부분이 두 구성간의 디렉토리 차이이다.

J2EE 환경을 구축하기 위해선 Java Blurprint 형식의 레이아웃이 더 알맞은 형식이라 생각한다.
netbeans 에서 웹 어플리케이션 프로젝트를 생성 하면 위의 두 형식의 표준을 모두 지원한다.
메뉴 -> File -> New Project... -> 프로젝트 카테고리에서 Web 선택 -> next 하면 아래와 같은 대화창이 뜬다.

넷빈즈에서 웹어플리케이션 레이아웃 선택 옵션


붉은 색 박스 안과 같이 두 양식 중 하나를 선택 할 수 있으며 이 두 양식의 선택에 따라 아래와 같은 표준 레이아웃으로 프로젝트가 생성 된다.
(추가 : 현재의 넷빈즈는(버전 6.0이상) 위와 같은 옵션이 사라지고 Java BluePrints형식에 맞추어 디렉토리가 설정됩니다. )

웹어플리케이션간 디렉토리의 차이


맨 위 디렉토리 형식에 추가하여 nbproject 와 test 디렉토리가 추가로 생성 되는데 nbproject에는 해당 웹 프로젝트에 대한 메타 데이타와
build.xml에 기술 되어야 할 앤트 스크립트의 실제 내용이 배치되며, test 디렉토리에는 test용 클래스등을 구성 할 수 있는 디렉토리로 존재하게 된다.

* MANIFEST.MF ?
Executable JAR 파일을 생성 할 때 main 클래스를 지정 하게 되는데
이 내용을 기술 하는 텍스트 파일이다.

그 기술 내용은

Mainfest-Version: 1.0
Main-Class: [filename] (.class 없이)
Created-By: [생성자 정보] (필요한 내용을 자유롭게 기술...)

이며 
실행은 콘솔에서
java -jar jarfilename.jar [엔터]
혹은 jre 가 설치 되었다면  jar 파일을 더블클릭 하는것으로 실행이 가능하다.

2008/12/23 11:14 2008/12/23 11:14
Trackback Address:이 글에는 트랙백을 보낼 수 없습니다

넷빈즈 6.5 출시 (NetBeans 6.5 released)

주말사이 넷빈즈 6.5 버전이 출시되었습니다.
넷빈즈 릴리즈 페이지에서 이야기하고 있는 6.5버전 하이라이트는 아래와 같습니다.
자바 이외의 언어 지원 강화에 역점을 둔 느낌입니다.
아래 소개하고있는 기능들과 더불어 넷빈즈 6.5에서 지원하는 모든 기능 목록은
http://www.netbeans.org/features/all.html 에서 확인하실 수 있습니다.

NetBeans 6.5 download : http://www.netbeans.org/downloads/index.html

Feature Highlights

PHP

  • PHP Editor (Code completion, syntactic and semantic code highlighting)
  • Support for heredoc notation and PHTML
  • Debugging using Xdebug
  • Generators for MySQL database code snippets
PHP Code Completion

JavaScript and Ajax

  • JavaScript Debugging on FireFox & Internet Explorer
  • HTTP transaction monitoring
  • Improved JavaScript and CSS Editor
  • JavaScript Library Manager incl Yahoo UI, Woodstock, jQuery, Dojo, Scriptaculous, Prototype libraries
JavaScript quickfixes popup in the editor

Java EE & Web Development

  • Enhanced support for Spring, Hibernate, JSF, JSF CRUD generator, JPA (Java Persistence API)
  • Create RESTful web services from database tables or from JPA entities
  • Drag and drop SaaS services into PHP files
  • SQL Editor Improvements (code completion, save/recall queries, and more)
  • Improved Eclipse project import and synchronization for Java Web projects
  • Automatic Deploy on Save
web application persistence

JavaFX

  • Create, test, debug, profile, and deploy JavaFX projects
  • JavaFX editor with syntax highlighting, source navigation, code completion, code folding, javadoc pop-ups, and error detection.
  • Live preview of visual elements
  • Code snippet palette for transformations, effects and animations
javafx video cube

Groovy and Grails

  • Develop pure Groovy apps or use Groovy in Java SE projects
  • Groovy editor with code completion, highlighting, and more
  • Grails web application framework
  • Open existing Grails applications without adding metadata
Groovy code editor

Ruby and Rails

  • New Test Runner interface for displaying test results
  • Rake improvements: Rake Runner and a pre-generated Rake file
  • Debugger: Conditional breakpoints and catchpoints
  • Ruby projects accept JVM options from command line
Ruby code editor

GlassFish v3 Prelude for Web Development

  • Modular, OSGi based architecture
  • Small footprint, fast startup and deployment
  • Support for scripting, including JRuby
glassfish app server

C/C++

  • Improved code completion, error highlighting, and semantic highlighting
  • Call graph, Memory window
  • Remote development
  • Packaging of application as tar files, zip files, or SVR4 packages
Call graph

Java ME

  • New project wizard for adding custom components to the Visual Designer Palette
  • New SVG UI components in the enhanced SVG Composer enable rich UI design
  • New Data Binding Custom Components in the Visual Designer Palette
  • Upgraded obfuscation tool to ProGuard 4.2 and test framework to JMUnit 1.1.0
Java ME SVG palette

Java Debugger

  • New multi-threaded debugging with improved UI and work-flow
  • Smart Step Into with method selection right inside expression
  • Deadlock detection with visual indication
swing treemodel view editor

Java SE

  • Automatic Compile on Save
  • Improved Eclipse project import and synchronization
  • Java Call Hierarchy
  • Analyze Javadoc
  • Swing GUI Builder can generate simple or fully qualified class names
swing treemodel view editor

IDE Tools and Usability

  • CamelCase code completion
  • Customize formatting settings per project
  • One IDE-wide QuickSearch shortcut for files/symbols/types, IDE actions, options, and docs
  • Support for Windows UNC paths (shared network folders)
netbeans ide quicksearch


2008/11/23 03:28 2008/11/23 03:28
Trackback Address:이 글에는 트랙백을 보낼 수 없습니다
  1. 2008/11/27 02:46
    드디어 NetBeans 6.5 정식 릴리즈 Tracked from Alchemize Your Self

넷빈즈 로드맵 업데이트


넷빈즈 6.1 이후 단기 로드맵이 공개 되었습니다.
이번에 공개한 로드맵에는 넷빈즈 6.5의 출시일이 표기되어 있습니다.

넷빈즈 로드맵

NetBeans RoadMap


넷빈즈 6.5가 10월 출시예정으로 미루어 보아 넷빈즈 7은 내년 5월에 있을 JavaOne 행사를 전후해서
발표하지 않을까 예상합니다.

넷빈즈 6.5의 새로운 그리고 향상된 기능일람이 궁금하신분은  Netbeans 6.5 Project Page를 방문해
보시기 바랍니다.

2008/06/27 19:13 2008/06/27 19:13
Trackback Address:이 글에는 트랙백을 보낼 수 없습니다

NetBeans 6.1의 놀라운 javascript 에디팅 기능

넷빈즈의 스크립트 랭귀지에 대한 지원이 지속적으로 확대되는 가운데, 이번 넷빈즈 6.1버전에서는
자바스크립트 에디터 역시 놀라운 기능 향상이 있습니다.
흡사 메이저 언어를 다루는듯한 신택스 하이라이팅 이라든지 코드 어시스턴스, 코드 인사이트뿐만 아니라
<script src=".."> 와 같이 불러들인 외부 js파일 역시 인라인 스크립트와 동일하게 지원하고 있습니다.

아래 url은 썬마이크로시스템즈의 넷빈즈 에반젤리스트 roman씨의 '넷빈즈 6.1의 자바스크립트 에디터 지원'
에 대한 스크린캐스트입니다.
http://www.netbeans.org/download/flash/js/javascript_demo.html

JavaScript에 대한 Code Completion

JavaScript에 대한 Code Completion


JavaScript에 대한 Rename Refactoring

JavaScript에 대한 Rename Refactoring


JavaScript 함수에 대한 Code Completion

JavaScript 함수에 대한 Code Completion


JavaScript 함수에 대한 Tasklist 지원

JavaScript 함수에 대한 Tasklist 지원


JavaScript에 대한 Quick Fix

JavaScript에 대한 Quick Fix


2008/05/07 13:49 2008/05/07 13:49
Trackback Address:이 글에는 트랙백을 보낼 수 없습니다

Eclipse 3.3 or NetBeans 6.0?

이클립스넷빈즈

Eclipse
vs. NetBeans

대표적인 두개의 자바 개발환경인 이클립스 3.3과 넷빈즈 6.0에 대한 비교기사가 JavaWorld에 실렸습니다.
테그놀로지 애널리스트인 Andrew Binstock씨는 이번 리뷰에서 '넷빈즈가 일 냈다.'라는 글을 남길정도로
넷빈즈의 발전에 주목하고 있습니다.

이번 리뷰에서 Netbeans 6.0과 Eclipse 3.3에대해 에디터, 랭귀지 지원, 엔터프라이즈 툴, 플러그인의 4가지
항목으로 비교를 진행 하고 있는데요.
넷빈즈의 강점으로
 - 쉬운 설치
 - 에디터의 강력함과 쉬운 사용
 - 랭귀지 지원 확대 - 특히, 넷빈즈는 Ruby에 대한 현재 최고의 IDE
 - 플러그인들
을 꼽고 있습니다.

두 IDE에 대한 비교결과로 사용상의 편의성과 에디터 기능, 다른 랭귀지 지원에선 넷빈즈가,
엔터프라이즈 지원과 플러그인 시스템에선 이클립스가 우세하다는 견해를 밝히고 있습니다.

두 자바 IDE에 대한 전문이 궁금하신분은 아래 url을 방문하시면 됩니다.

기사 전문 : http://www.javaworld.com/javaworld/jw-03-2008/jw-03-java-ides0308.html
2008/03/25 13:53 2008/03/25 13:53
Trackback Address:이 글에는 트랙백을 보낼 수 없습니다

NetBeans IDE 6.1 Beta Released :: 넷빈즈 6.1의 향상된 기능

Netbeans.org에 냇빈즈6 의 마이너 업그레이드인 6.1 베타가 출시되었음을 알리는 기사가 실렸습니다.

이번 넷빈즈6.1 버전에는 몇 가지 향상된 기능과 새로운 기능이 추가되었다고 하는데요..
자바스크립트 에디트 기능, Spring 프레임워크에 대한 지원, MySQL 통합, 프로젝트 간의 라이브러리 공유를 위한
더 나은 방법 제공, quick fix 기능이 포함된 ruby/jruby 에디터와 루비 플랫폼 매니저의 추가, 그리고 jruby에 대한
디버거 지원 등이 포함됩니다. 이뿐만 아니라 많은 이들의 요구하였지만 6.0에서는 빠졌던  Bean Pattern과
JSF CRUD 생성 기능이 포함됩니다. 추가로  ClearCase지원과 같은 새로운 플러그인 도 준비되었습니다.
이번 릴리즈에서는 향상된 성능과(스타트업 속도 40% 향상), 적은 메모리 소비, 많은 파일을 포함하는 프로젝트에
대한 응답성 향상 등을 장점으로 꼽고 있습니다.


이번 넷빈즈 6.1에서 주목할 만 한 기능을 하나씩 살펴보겠습니다.

자바스크립트 지원
- 코드 하이라이팅
- 코드 자동완성과 타입 분석
- Quick Fix기능과 코드 체크
- 리팩토링

자바스크립트 지원

자바스크립트 지원


성능 향상
- 구동시간의 40% 단축
- 파서 성능향상에 따른 빨라진 자동완성 기능
- 적은 메모리 소비

스프링 프레임워크 지원
- Spring Framework 2.5 라이브러리 번들
- XML 설정과 Controller에 대한 마법사 형식 지원
- bean name, java class와 프로퍼티에 대한 코드 자동완성 지원
- web project에서 spring frmawork 지원
스프링 프레임워크 지원

스프링 프레임워크 지원


Database Explorer 에서의 MySQL지원
- MySQL 서버 등록
- 데이타베이스의 view, create, delete
- MySQL administration tool 구동
MySQL지원

MySQL지원


Java Bean 지원
- Navigation 메뉴에서 Bean Pattern 탐색
- Bean Property 생성
- BeanInfo 에디트

JSF CRUD 생성
- 데이타베이스 어플리케이션의 빠른 생성
- one-to-one, one-to-many, many-to-many 엔티티 릴레이션 지원
JSF CRUD 생성

JSF CRUD 생성


Ruby/JRuby 지원
- 힌트와 fix 기능이 포함된 향상된 에디터
- JRuby에 대한 빠른 디버깅
- Platform Manger
- 레일스 프로젝트에 대한 서버와 데이타베이스 통합성 향상
Ruby / JRuby 지원

Ruby / JRuby 지원


Javadoc 코드 자동완성
- @param등의 표준 태그 지원
- 파라메터와 익셉션등에 대한 코드 자동 완성
Javadoc 코드 자동완성

Javadoc 코드 자동완성


프로젝트 공유
- 버전 컨트롤 시스템을 통한 팀원간의 손쉬운 프로젝트 공유
- Java, Web등 모든 프로젝트 타입에 대해 상대경로로 라이브러리 패스 설정
- 프로젝트간의 의존성 설정
- 프로젝트의 자동 빌드
프로젝트 공유

프로젝트 공유


새로운 업데이트센터 모듈
- ClearCase 지원
- AIXS 지원
- SOAP UI 지원
SOAP UI 지원

SOAP UI 지원


2008/03/18 20:14 2008/03/18 20:14
Trackback Address:이 글에는 트랙백을 보낼 수 없습니다

기존 Java 소스 코드를 NetBeans IDE 5.0으로 가져오기

이 문서에서는 NetBeans IDE 프로젝트에서 기존 소스 코드를 가져오는 방법을 설명합니다. 첫 번째 시나리오에서는 표준 Java 프로젝트로 작업할 때 필요한 단계를 설명하고, 두 번째 시나리오에서는 자유 형식 Java 프로젝트(기존 Ant 스크립트 사용)로 작업할 때 필요한 프로세스를 설명합니다. 두 시나리오 모두에서 가상의 BlackJack 프로젝트 예를 사용하여 NetBeans IDE에서 응용 프로그램 코드를 설정하는 방법을 설명합니다.

기존 J2SE 소스 코드를 가져오는 데 사용할 수 있는 프로젝트 템플리트에는 두 가지가 있습니다.

  • 기존 소스의 Java 프로젝트 - 이 프로젝트 템플리트는 표준 Java 프로젝트를 생성하는 데 사용됩니다. 표준 Java 프로젝트에서는 IDE를 사용하여 응용 프로그램을 컴파일, 실행 및 디버깅합니다.
  • 기존 Ant 스크립트가 있는 Java 프로젝트 - 이 프로젝트 템플리트는 자유 형식 Java 프로젝트를 생성하는 데 사용됩니다. 자유 형식 Java 프로젝트는 사용자 Ant 스크립트를 사용하여 프로젝트를 실행, 컴파일 및 디버깅합니다.

    다른 유형의 프로젝트 템플리트에 대한 자세한 내용은 프로젝트 유형 비교를 참조하십시오.

코드 작업 시작

가상의 BlackJack 응용 프로그램은 com.jcardshark.blackjack.ui, com.jcardshark.blackjack.lib 및 resources의 세 가지 패키지로 구성되어 있습니다. 이 자습서에서는 이 세 패키지가 JavaGames 폴더의 BlackJack 폴더에 있다고 가정합니다. 아래 스크린샷에서는 가상의 디렉토리 트리를 보여줍니다. 라이브러리 폴더에는 jcardshark-core.jar라는 JAR 파일이 있는데, 이 파일은 com.jcardshark.blackjack.ui 및 com.jcardshark.blackjack.lib 패키지의 클래스 경로에 있어야 합니다.

BlackJack 프로젝트의 소스 폴더 레이아웃을 보여주는 표준 탐색기 창


IDE를 사용한 작성, 실행 및 디버그: 표준 프로젝트

작업을 시작하려면 BlackJackUI 응용 프로그램의 주 시작점으로 사용할 주 프로젝트를 생성해야 합니다. 이 프로젝트에는 두 개의 소스 루트가 포함됩니다. 다음으로는 응용 프로그램에 필요한 BlackJackLib 소스를 저장하는 종속 프로젝트를 생성합니다. 다음은 추가 라이브러리와 BlackJackLib 프로젝트 자체를 모두 BlackJackUI 프로젝트의 클래스 경로에 추가합니다. 마지막으로는 응용 프로그램을 실행하여 작업 결과를 테스트합니다.

여러 소스 루트가 있는 프로젝트 생성

  1. 파일 > 새 프로젝트(Ctrl-Shift-N)를 선택합니다.
  2. 일반 > 기존 소스의 Java 프로젝트를 선택합니다. 다음을 클릭합니다.
  3. 프로젝트 이름 필드에서 BlackJackUI를 입력합니다. IDE에서는 프로젝트 폴더의 이름에 이 이름을 자동으로 제안합니다.
  4. 프로젝트 폴더 필드 옆에 있는 찾아보기 버튼을 클릭하고 NetBeans 프로젝트를 넣을 NetBeans_projects라는 폴더를 시스템에 생성합니다. 다음에는 새로 생성된 NetBeans_projects 폴더를 선택하고 주 프로젝트로 설정 상자가 선택되었는지 확인한 후 다음을 클릭합니다.

    주: 위에서 지정한 경로가 다음과 같이 나타납니다. NetBeans_projects/BlackJackUI

  5. 소스 패키지 폴더 창에서 폴더 추가를 클릭하고 JavaGames/BlackJack/BlackJackUI 폴더로 이동한 후 resources 및 src 폴더를 선택합니다.
  6. (선택 사항) 테스트 패키지 폴더 창에서 찾아보기를 클릭하여 JUnit 패키지 폴더가 포함된 폴더를 선택합니다. BlackJack 프로젝트에는 JUnit 테스트가 포함되어 있지 않기 때문에 이 단계를 건너뛰어도 좋습니다.
  7. 마침을 클릭합니다.

    BlackJackUI 프로젝트가 프로젝트 창과 파일 창 모두에 표시됩니다.

종속 프로젝트 생성

  1. 파일 > 새 프로젝트(Ctrl-Shift-N)를 선택합니다.
  2. 일반 > 기존 소스의 Java 프로젝트를 선택합니다. 다음을 클릭합니다.
  3. 프로젝트 이름 필드에서 BlackJackLib를 입력합니다.
  4. 프로젝트 폴더 필드 옆에 있는 찾아보기 버튼을 클릭하고 앞에서 생성한 NetBeans_projects 폴더로 이동합니다. 주 프로젝트로 설정이 선택되어 있지 않은지 확인하고 다음을 클릭합니다.

    주: 위에서 지정한 경로가 다음과 같이 나타납니다. NetBeans_projects/BlackJackLib

  5. 소스 패키지 폴더 창에서 폴더 추가를 클릭하고 JavaGames/BlackJack/BlackJackLib 디렉토리로 이동한 후 src 폴더를 선택합니다.
  6. 마침을 클릭합니다.

    다음 그림과 같이 프로젝트 창과 파일 창 모두의 BlackJackUI 프로젝트 옆에 새 BlackJackLib 프로젝트가 표시됩니다.

프로젝트 클래스 경로 관리

이제 /JavaGames/Libraries/ 폴더에 있는 추가 라이브러리를 BlackJackLib 종속 프로젝트와 주 BlackJackUI 프로젝트 모두에 추가해야 합니다.

  1. 프로젝트 창에서 BlackJackLib 프로젝트의 라이브러리 노드를 마우스 오른쪽 버튼으로 클릭하고 JAR/폴더 추가를 선택합니다.
  2. JavaGames/Libraries/jcardshark-core.jar를 선택하고 열기를 클릭합니다. JAR 파일이 프로젝트의 클래스 경로에 추가됩니다.
  3. 1-2단계를 반복하여 JavaGames/Libraries/jcardshark-core.jar를 BlackJackUI 프로젝트의 클래스 경로에 추가합니다.

이제 BlackJackLib 프로젝트 자체를 BlackJackUI 프로젝트의 클래스 경로에 추가하겠습니다.

  1. BlackJackLib 프로젝트의 라이브러리 노드를 마우스 오른쪽 버튼으로 클릭하고 프로젝트 추가를 선택합니다.
  2. NetBeans_projects 폴더로 이동한 후 BlackJackLib 프로젝트 폴더를 선택합니다. 프로젝트의 모습은 다음 그림과 같습니다.

응용 프로그램 실행

  1. 실행 > 주 프로젝트 실행을 선택하여 응용 프로그램을 실행합니다.
  2. 나타나는 대화 상자에서 BlackJack.java를 주 클래스로 설정합니다.

사용자 Ant 스크립트를 사용한 컴파일, 실행 및 디버깅: 자유 형식 프로젝트

사용자 build.xml 파일이 이미 있는 경우에는 응용 프로그램에 자유 형식 프로젝트를 생성할 수 있습니다. 자유 형식 프로젝트를 작성, 실행 및 디버깅하려면 필요한 모든 Ant 대상을 적절한 IDE 명령에 수동으로 연결하고 프로젝트의 소스 폴더를 설정해야 합니다. BlackJack 응용 프로그램에서 기존 Ant 스크립트가 있는 자유 형식 프로젝트의 사용에 대해 살펴 봅시다.

앞의 예에서와 같이 먼저 응용 프로그램과 필요한 자원을 넣을 프로젝트를 생성해야 합니다. 다음으로는 필요한 소스를 추가하고 응용 프로그램의 소스 수준을 지정하여 응용 프로그램에서 IDE 명령을 호출할 수 있게 해 주는 Ant 대상을 매핑하고 프로젝트의 클래스 경로를 구성합니다. 마지막으로는 프로젝트를 작성 및 실행하여 응용 프로그램을 테스트합니다.

자유 형식 프로젝트 생성

  1. 파일 > 새 프로젝트(Ctrl-Shift-N)를 선택합니다.
  2. 일반 > 기존 Ant 스크립트가 있는 Java 프로젝트를 선택합니다. 다음을 클릭합니다.
  3. 마법사의 이름 및 위치 페이지에서 위치 필드 옆에 있는 찾아보기 버튼을 클릭하고 JavaGames/BlackJack 폴더를 선택합니다. IDE에서 이 폴더를 새 프로젝트 폴더의 위치로 자동으로 제안합니다. 위치 폴더에는 프로젝트의 작성 스크립트가 포함되어 있기 때문에 IDE에서는 자동으로 작성 스크립트 위치를 선택합니다.
  4. 프로젝트 이름 필드에 BlackJack을 입력하고 주 프로젝트로 설정 확인란이 선택되어 있는지 확인한 후 다음을 클릭합니다.

IDE 명령에 Ant 대상 연결

  1. 마법사의 작업 작성 및 실행 페이지에서 프로젝트 명령으로 실행할 IDE 대상을 지정합니다.
    주: Ant 스크립트에 명령의 대상이 포함되어 있지 않기 때문에 Javadoc 생성 및 프로젝트 테스트는 비워 둡니다. 이 명령은 대상을 쓸 때까지는 IDE에서 사용할 수 없습니다.
  2. 다른 대상 필드를 채우고 나면 다음을 클릭합니다.

소스 폴더 구성

  1. 마법사의 소스 패키지 폴더에서 폴더 추가를 클릭하고 /JavaGames/ 폴더로 이동한 후 프로젝트에 BlackJackLib/src, BlackJackUI/src 및 BlackJackUI/resources 폴더를 추가합니다.
  2. 소스 수준 콤보 상자에서 응용 프로그램을 컴파일 및 실행할 JDK 버전을 선택합니다. 다음을 클릭합니다.
  3. 마법사의 Java 소스 클래스 경로 페이지의 소스 패키지 폴더 콤보 상자에서 /BlackJackLib/src를 선택합니다. 그리고 JAR/폴더 추가를 클릭하여 소스 폴더의 클래스 경로에 jcardshark-core.jar를 추가합니다.
  4. 소스 패키지 폴더 콤보 상자에서 /BlackJackUI/src를 선택한 후 소스 폴더의 클래스 경로에 BlackJackUI/resources, BlackJackLib/src 및 jcardshark-core.jar를 추가합니다.
    주: 이 클래스 경로는 컴파일 또는 실행에 사용되지 않습니다. 이런 태스크에 사용되는 클래스 경로는 Ant 스크립트에서 처리합니다. 이 설정은 코드 완성 및 리팩토링에 포함할 클래스를 IDE에 알리기만 합니다.
  5. 마침을 클릭합니다.

    BlackJackUI 프로젝트가 다음 그림과 같이 프로젝트 창과 파일 창 모두에 표시됩니다.


    IDE의 프로젝트 창과 파일 창에 표시되는 자유 형식 BlackJack 프로젝트의 레이아웃

프로그램 실행

  • 실행 > 주 프로젝트 실행을 선택하여 응용 프로그램을 실행합니다.
    주: 프로젝트의 Ant 스크립트에는 응용 프로그램 실행에 사용할 대상이 있어야 합니다.

@http://www.netbeans.org/kb/50/import_j2se_ko.html

2008/02/18 21:30 2008/02/18 21:30
Trackback Address:이 글에는 트랙백을 보낼 수 없습니다

넷빈즈 6.0 코드 템플릿 사용하기 :: NetBeans 6.0 Code Template

대부분의 현대적인 IDE는 코드작성의 효율성을 높이기 위해 코드 전체를 타이핑하지 않아도 문장을 완성해 주는 기능을 가지고 있습니다.
우선 아래 영상을 봐 주시겠습니까?


위 영상을 보시면 자바 코드로 System.out.println(""); 이라든지 if-else 구문을 완성하기 위해 짧은 축약어를 입력하고 예약된 키
( 예제에서는 Tab 키를 사용 했습니다. ) 를 눌러 완전한 코드를 만들고 있는데요..
이를 넷빈즈에서는 코드템플릿(Code Template)라고 부르고 있습니다.

이 코드 템플릿을 설정하려면 넷빈즈 메뉴바에서 Tools -> Options를 선택 하시면 나타나는 대화창에서
Editor -> Code Templates 항목에서 원하는 짧은 키와 템플릿을 완성할 키를 입력하시면 됩니다.

NetBeans 6.0 Code Template Option

넷빈즈 6.0 코드 템플릿 설정


2007/12/17 14:28 2007/12/17 14:28
Trackback Address:이 글에는 트랙백을 보낼 수 없습니다

넷빈즈( NetBeans ) 6.0 자바 소스 인코딩 설정은 어디서?

넷빈즈 4, 5 버전때까지는 자바소스의 인코딩 설정을 [옵션->Java Source] 항목에서 결정할 수 있었다.
(http://www.yunsobi.com/blog/52 참조)

사용자 삽입 이미지
[넷빈즈4 / 5 버전대의 소스 인코딩 설정 위치]


넷빈즈 6.0 버전으로 오면서 이 설정의 위치가 바뀌었다. 넷빈즈 6.0에서는 프로젝트 프로퍼티창의 소스 카테고리에서 설정이 이루어 진다.

사용자 삽입 이미지
[개별 프로젝트의 Properties 항목 선택 후]


사용자 삽입 이미지
[Source 카테고리에서 인코딩 설정]


옵션 위치의 변화는 무엇을 의미하는걸까?
4 / 5 버전대에서는 소스코드의 인코딩이 모든 프로젝트에 일괄 적용 될 수 밖에 없는 구조이지만, 6 과같이 프로젝트 프로퍼티로
옵션 위치를 변경하면 각 프로젝트마다 자바소스의 인코딩을 달리 적용 할 수 있음을 의미하며, 이는 IDE가 개별 프로젝트를
좀 더 유연하게 받아들일 수 있는 바탕이기도 하다.


#잠깐만 !!
 넷빈즈 IDE에서 위처럼 인코딩 옵션을 설정하며 자바소스 코드의 인코딩에만 영향을 미치며
 이 설정은 JSP 소스 인코딩에 영향을 주지 않는다. JSP소스 인코딩은 서블릿 규약에 따라 JSP
 페이지 디렉티브의 pageEncoding 속성에 기술하면 된다.
<%@ page contentType="text/html; charset=utf-8" pageEncoding="utf-8"%>


2007/12/08 23:26 2007/12/08 23:26
Trackback Address:이 글에는 트랙백을 보낼 수 없습니다

넷빈즈(NetBeans) 메뉴의 폰트를 깔끔하게 해보자

MS 비스타에 넷빈즈를 설치 해 본 사람은 메뉴바의 지저분한 폰트에 당황하였을 것이다.
비스타의 기본 폰트가 맑은고딕으로 바뀌면서 작은 크기로 메뉴의 폰트를 적용하다 보니 이렇게 된 것 같다.

해결 방법은 간단하다. 넷빈즈의 configuration 파일에 실행옵션으로 폰트 사이즈를 약간만 키워주면 된다.
[넷빈즈 설치 디렉토리]\etc\netbeans.conf 파일을 열어보면 ( http://www.yunsobi.com/blog/140 참조)

netbeans_default_options="-J-Xms32m -J-Xmx128m -J-XX:PermSize=32m -J-XX:Max...

과 같이 넷빈즈 실행 옵션이 기술되어 있다.
이 옵션의 줄의 마지막에 --fontsize 12 와 같이 폰트를 약간 키워주는 옵션을 기술한 후 넷빈즈를 다시 기동하면
깔끔한 메뉴를 볼 수 있다.

요렇게..

netbeans_default_options="-J-Xms32m -J-Xmx128m -J-XX:PermSize=32m -J-XX:MaxPermSize=160m -J-Xverify:none -J-Dapple.laf.useScreenMenuBar=true -J-XX:+UseConcMarkSweepGC -J-XX:+CMSClassUnloadingEnabled -J-XX:+CMSPermGenSweepingEnabled --fontsize 12"


적용 전적용 후

어떤가? 조금은 보기 편해졌는가?

2007/12/07 20:48 2007/12/07 20:48
Trackback Address:이 글에는 트랙백을 보낼 수 없습니다
  1. Blog Icon
    김정래

    완전 잘 되네요!!
    감사합니다!!

넷빈즈 6.0 출시 :: NetBeans 6.0 Released!!

마일스톤, 베타, 캔디데이트를 거쳐 드디어 넷빈즈 6.0이 정식 출시 되었습니다.
넷빈즈 6.0 출시에 발맞추어 5.0 출시때와 마찬가지로 netbeans.org의 화면도 변화가 있네요.
(하지만 플러그인 탭으로 들어가면 아직까진 5 버전때의 화면을 볼 수 있습니다.)

netbeans.org
새 디자인이 적용된 netbeans.org


아래는 앞으로 넷빈즈의 개발 로드맵입니다. 현재 정식출시된 6.0 버전의 마이너 업그레이드는
계속 되겠지만, 메이저 업그레이드는 한동안 없을 것 같군요.
netbeans roadmap

넷빈즈 6.0 다운로드는 여기에서 할 수 있습니다.
다운로드 할 수 있는 패키지 형식도 다양해 졌습니다..
지금까진 NetBeans only,  NetBeans + J2SE, NetBeans + J2EE Server 세가지 종류의 패키지로
배포가 되었는데 이제는
Web & Java EE,  Mobility,  Java SE,  Ruby,  C/C++,  All  등으로 좀더 특화/세분화 되었습니다.
 물론 어떤 패키지를 받더라도 플러그인 다운로드를 통하여 다른 패키지의 기능을 추가할 수 있습니다.

넷빈즈 패키지 테이블


2007/12/06 12:40 2007/12/06 12:40
Trackback Address:이 글에는 트랙백을 보낼 수 없습니다

최고의 루비온레일스 개발도구 넷빈즈 :: Netbeans THE best ruby on rails IDE

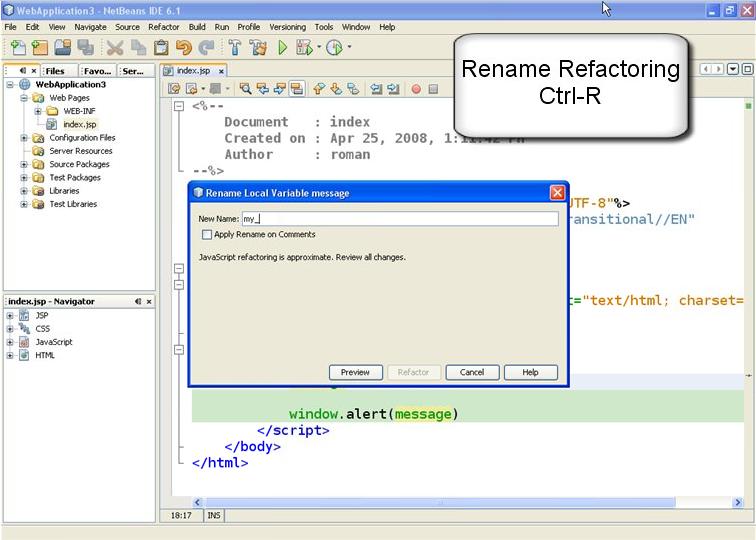
아직까지 Ruby를 사용해 프로젝트를 진행 해 본 적은 없지만, 살짝 관심을 가지고 있기때문에 몇몇 자료를 찾는동안 넷빈즈의 루비에디딩에관한 포스팅이 있어 찬찬히 보기위해 옮겨둠.

I use netbeans 6, milestone 10 (get it here) as my ruby on rails ide now. I’m a mac user, having moved from windows last year.

I was gonna write a blow for blow comparison of netbeans against radrails, but I really see no point. I figured it’s best just to tell you why netbeans’ rails support is so creamingly good, but so you know I have evaluated both and textmate, firstly – here’s some points about the other 2.

Text Mate

First up, as a general text editor I love textmate, it’s truly fab – and it’s NOT an IDE.. which is my number 1 reason for not using it for RoR: I was new to rails so needed an IDE that had some code completion, or just some documentation support, which textmate doesn’t support. Also I found that to get it working in a way I liked took ages – on top of that the following annoyances really pissed me off:

  • The indent key not being tab (it’s square bracket),
  • The project window (drawer) disappearing from time to time,
  • Dragging more folders into a project is like playing an 8-bit platform game: you have to be pixel perfect,
  • The find really means find (as in you can’t see where the search results are, you literally have to scan the page to find what textmate has found – and it never seems to wrap searches for me).

But as I said, textmate still rocks, but it wasn’t floating my ruby boat.

Eclipse

“It ain’t no use in calling out my name, Gal

Like you never done before

And it ain’t no use in calling out my name, Girl

I can’t hear you any more

I’m a thinking and a wond’ring all the way down the road

I once loved a woman, a child, I’m told

I gave her my heart, but she wanted my soul

But don’t think twice, it’s all right”

Bob Dylan – “Don’t think twice, it’s all right”

Okay perhaps a bit too dramatic, but really – when I first found eclipse, I was in love. I was using power flasher from FDT, which was THE best actionscript editor of all time imho. Eclipse was an utter revelation for me. I would sing it’s praises (I mean metaphorically, not like Bob Dylan) to my friends and colleagues, even my clients.

When Flex builder came out I was similarly marvelled by its’ ease of use for editing as3 and mxml (especially the layout gui) – but like the matrix, my eyes had never really learned to see. You see, I’d only recently moved from windows to mac – and was starting to shed the weight of windows with its’ dialogue boxes, bugs, qwerks, awkward behaviours, work-arounds and was starting to find out what computing was really meant to be like.

I’d been singing my “eclipse rocks” song on #flex and arguing it’s pro’s and cons with some visual studio lovers there. I found I didn’t have the will to defend it anymore: I was starting to fall out with eclipse very rapidly. Here are some reasons:

  • Subversion support is cacka.. Honestly, it sucks balls,
  • Find and replace dialogue is like punishment – it’s just dumb and clunky,
  • Context sensitive menu items are never what I want,
  • Setting up a project is like being told off by your nan. Honestly, it’s always “You can’t put a project here”, “There is an existing project somewhere near this folder, I can smell it”, “I am going to waste 20 minutes of your time MWAHAHAH”. Okay, I might be exaggerating the error messages – but anyone who knows the pain will understand what I mean.
  • In fact, that last point is the reason I put the Bob Dylan song reference – Eclipse feels like the girlfriend (or boyfriend) who just wants too much.

On top of that rails support in eclipse is only available via RadRails. RadRails seems to be the back burner project for Aptana these days – very little has been achieved with radrails this year (I’m saying this in comparison to netbeans). No offence to radrails: what they achieved at the time was truly incredible especially with just 2 coders doing it for love.

However, for me at least, radrails has the following problems:

  • Code completion is abysmal, and really, if I’m not going to get that feature, why use eclipse (100+mb of ram) instead of textmate?
  • In line documentation isn’t too good,
  • Not a very nice workflow for me – feels, dare I say it, too much like eclipse,
  • It’s in eclipse – which means all the pain in the arse problems of eclipse, with the limitations of radrails.

I’m sure radrails can be truly great with some time, but it seems like all that time is spent on implementing php support for aptana (which incidentally is very very good, and if it wasn’t in eclipse, and had better rails support, I would use).

Enough whining, I thought this article was about netbeans!

Okay, so that’s my little whinge done – I was sick of radrails, and I needed more than textmate could give me – I needed an ide that helped me to learn ruby on rails, not that helped me to learn the ide. I wasn’t a rails guru, all the textmate shortcuts in the world weren’t going to help me. I looked about and by chance came across an article that said that ruby on rails support was being added to netbeans 6. I hunted around like a crack addict and found the nightly builds to try out.

I was extremely impressed.

Netbeans is fucking fab, it proper rocks. I’ve been on netbeans 6 since milestone 8, which is about 1,000 builds now (they’re constantly working on it, and updating it). I’ve been with it through broken indentation, broken code completion, broken everything, null pointers, new features, more efficiency, the memory leak sorted out. I’ve watched it evolve before my eyes: I was installing new builds twice a day – Now it’s so stable and so good that I haven’t updated my build in a month (I might later on ;-).

I thought netbeans was only for Java, and the name sucks balls!

I agree on both of these points. I too thought it was only for Java, and I HATE the name. Truly – I once upon a time, had to work with beans in weblogic, and the name reminds me of that. I always thought it was a sucky name for Java objects, and I think it’s worse for an IDE.

However rest assured, I know, I know – you think it’s just for Java, even now months on I find myself wanting to banish it to hell, because it must be from the devil itself, because netbeans is just for Java… but after some time, I’m sure I’ll come to accept that the program I edit my rails in every day, really, truly, is netbeans.

Doesn’t it use like, 1 gajillion uberbytes of ram?

No, though it isn’t a text editor, and has a lot of functionality, so it does use a fair amount of ram. The whole IDE is easily comparable to eclipse for ram use, BUT: You an get a standalone version of the ide, which only has the ruby support. I believe you can get it here

I’ve got an imac with 3gb of ram, so I’ve got netbeans with the full monty, all my c++, java, and ruby plugins, so despite the fact it uses as much ram as a small os (about 250mb) I don’t even notice.

When I only had 2gb, I was perfectly comfortable with the standalone version, which would use between 80mb and 120mb).

So why is netbeans so good?


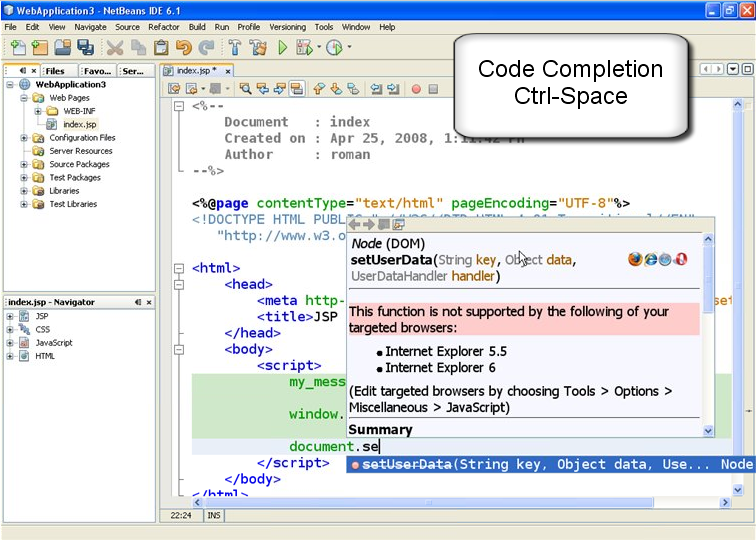
Code completion that works – really really works:

Code completion is activated with CTRL + SPACE – once activated you can type, or select from the list:

Image of code completion

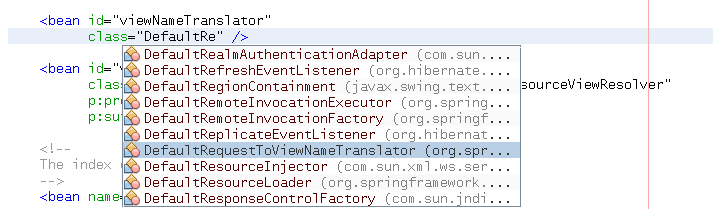
The code completion knows a lot of the rails framework already:

Image of code completion

Like this…

Image of code completion

And this…

Image of code completion

Upon selecting the item you’re looking for it also puts place holders in for completion, so you can tab through to enter arguments:

Image of code completion

It works on your own classes too, check this out – NO OTHER RAILS IDE can do this, to my knowledge:

Image of code completion

I like the way it groups all the attributes up by the object too – also, it doesn’t just work for my models, it works also for my other classes, look at this IPAdress from my Infrid module, netbeans knows about that too:

Image of code completion


The best subversion integration I have ever seen in an IDE:

You can easily track the status of your files – from here I can clearly see that database.yml is updated while edit.rhtml is new:

Image of svn integration

The subversion context menu gives you everything you need.

Image of svn integration

Here’s what happened when I clicked “show changes” on my vcRails project

Image of svn integration

And from here you can select to commit, update, do diffs, etc

Image of svn integration

You can search the history for any files (might be hard to see, but you can search by message, user, date)

Image of svn integration

And here are what the diffs look like in the files themselves:

Image of svn integration


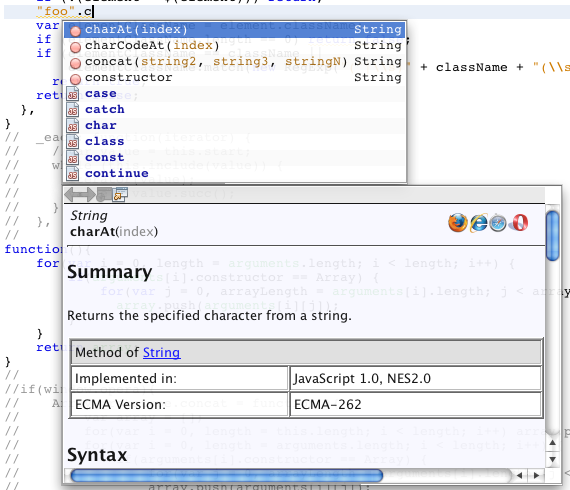
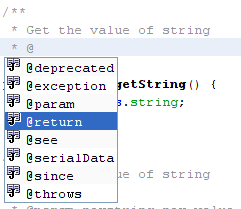
In line documentation when you need it, where you need it:

Just press CTRL+SPACE on a keyword and you get the docs.

Image of inline documents

Even picks out the documentation from your own methods

Image of code completion


Purdy colours:

I like the default colours of netbeans very much -here’s what one of my models looks like:

Image of syntax highlighting

And here’s an rhtml file:

Image of syntax highlighting

And here’s an rjs file:

Image of syntax highlighting

And here’s a yaml file:
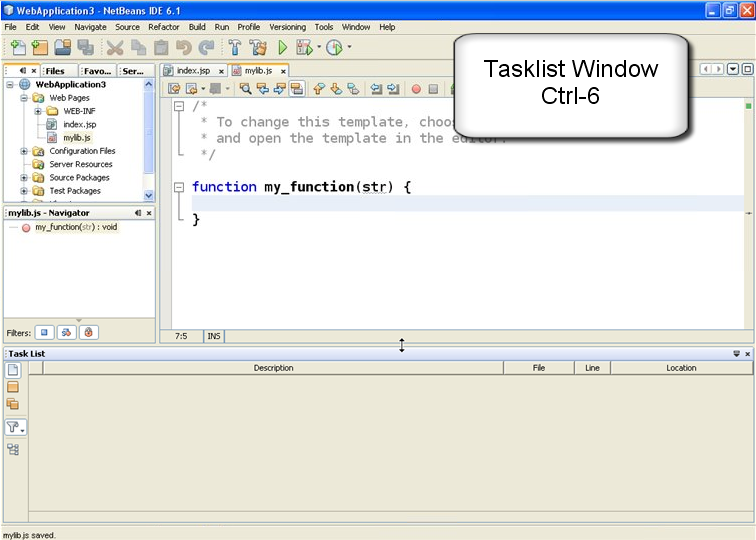
Image of syntax highlighting


Code navigator

This useful little window tells you the anatomy of the file your viewing, double click to go straight to a method:

Image of code navigator


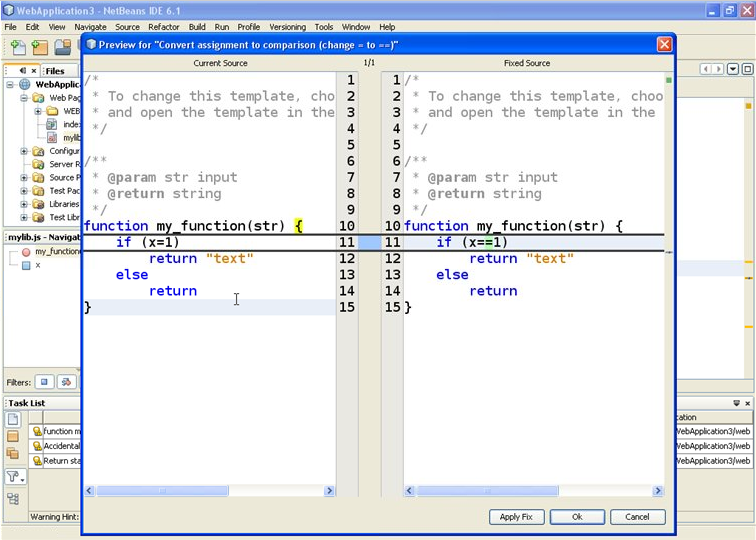
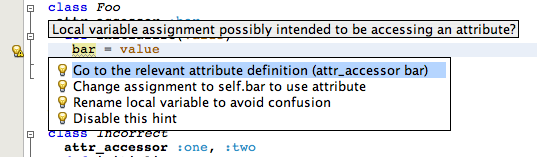
Useful highlighting:

I swear these guys have read design documents or suchlike, it’s so useable, look at this – I click on if:

Image of syntax highlighting

Click on end, or move the caret over it with the cursor keys:

Image of syntax highlighting

Click on rescue, or move the caret over it with the cursor keys:

Image of syntax highlighting

Same for a bracket:

Image of syntax highlighting

Also note the grey squiggly line under the variable – this is netbeans telling me that I never use that variable – oops! Glad I wrote this post!. :)

A variable, or keyword:

Image of syntax highlighting


code folding:

You use the + and – buttons to fold code

Image of code folding

And unfold it

Image of code folding


useful aids:

I wont show screen shots for these, just take my word for it

  • Typing a bracket, or a quote, or square bracket will give you a matching bracket.
  • Highlighting text, then pressing ( or ” or [ will wrap it in the appropriate symbol.
  • Unlike other text editors (both eclipse and textmate) deleting an auto inserted character isn’t a pain the bum. E.g. if I type ‘(’ and it automatically inserts ‘)’, upon changing my mind and deleting the ‘(’ it will also delete the ‘)’
  • Really smart tab indenting – trust me, it really smartly indents the tabs. IT does some great stuff with tab indentation – also you can indent blocks using tab or shift and tab.. you just select a bit of your code..

Image of indenting

Press tab (note that the first line wasn’t totally selected, so you can indent a line by only select a few chars – mint!

Image of indenting

And you can tab back with shift and tab. Also note that the entire thing gets flattened.. With each subsequent press of shift tab, it will flatten another level – this is one of my fave features as I can easily re-factor blocks of code and then get them indented super quick in a doddle. (I hate it when editors will stop me from flattening my code using the indent feature)

Image of indenting

A syntax error in my rhtml:

Image of syntax error


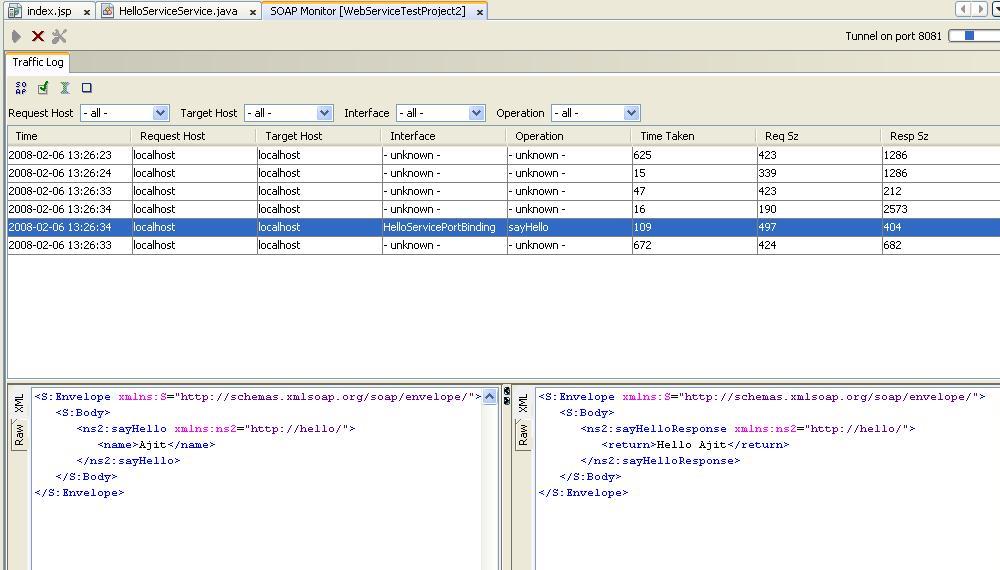
Log output, complete with hyperlinks for errors

I love the log output window – it shows you the results of rakes, svn submits, and best of all log output from your running mongrel (which you can run from in netbeans by clicking the play icon).

Here you can see the output of my running mongrel. It automatically turns stack traces into hyperlinks.. Click on them and you go straight to the line.

Image of syntax error


Jump straight to definitions

Holding down the apple key (CTRL on windows?) and mousing over a keyword, method, attribute or object will highlight any that netbeans can identify (which is most). If you then click on that definition, it will go straight to the code for it. I would show you a pick of this, but I’ve done so many!! I’m sure you get the idea.


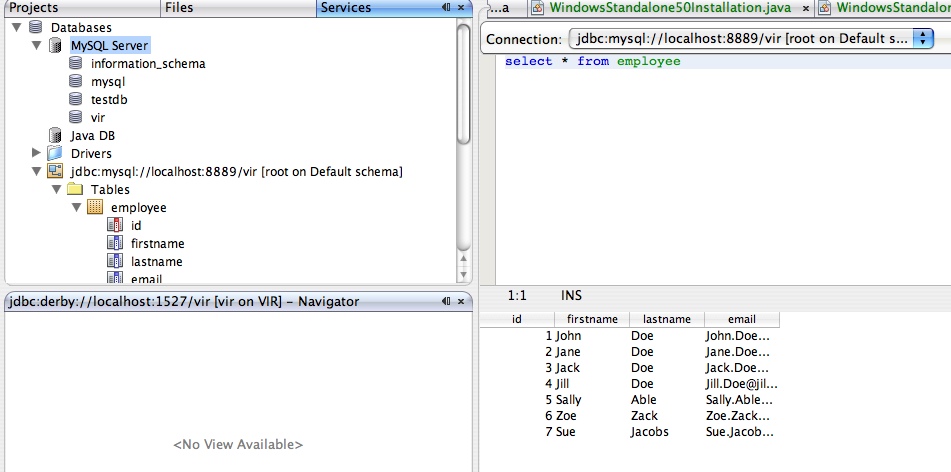
Top class database integration, built straight in

It’s easy to get set up with a sql database and perform selects, updates, create tables, etc, all in netbeans

Image of sql editor


First class debugging

Of course you can debug nicely with drb, but netbeans really goes much much further. It’s actually close to what I was used to in visual studio. It really is fully integrated.

You can set breakpoints in your code from the ide:

Image of debugging

And then run your rails app by selecting debug from the menu, or clicking the relevant icon.

As you’d expect: code execution stops when you hit the breakpoint, but back in netbeans the party is just starting:

Image of debugging

View all environment variables – you can see their types, and contents, and expand hashes and arrays too !

Image of debugging

Set watches:

Image of debugging

View the entire calls stack – double clicking will take you to appropriate file at the right place.

Image of debugging

Step through the code:

Image of debugging

And here we can see I’ve advanced a couple of lines: (I pressed F8) – note the watch I had set up, I can see the user that got returned by the code, and his attributes:

Image of debugging

You can even mouse over objects and variables when in breakpoint mode and the ide will pop up the values (my mouse is over request.remote_ip):

Image of debugging

And look at the user.email variable (my mouse is over that too)

Image of debugging

I didn’t realise, but I can actually change the variable in realtime, and it shows me the current value (I changed email to id).

Image of debugging

I don’t think it gets much better than that!


Full support of rake and script tasks

You can run rake and script tasks such as server, console and generate straight from the project tree:

Image of tasks

Rake tasks:

Image of tasks

Generations:

Image of tasks


Manage your gems, right from the ide

Note, I’m not suggesting that all this GUI loveliness is easier, or better than using the command line – I’m a hopeless keyboard junky, and my mouse is just an interruption to the conversation I have with my keyboard- however, sometimes I’ve got loads going on, and I just can’t be arsed to open another terminal window for one command (sacrilege?) – in these cases, like generating a new migration, or checking what gems I have installed, it’s convenient

Image of tasks


Execute database migrations from the ide

This is really handy:

Image of tasks


Execute all of your tests inside netbeans!

I’m not even going to get started on this.. perhaps a future blog post!


(imho) Best search, find, replace of any ide, I’ve ever used

I cannot begin to tell you how much I love search and replace in netbeans:

  • Supports regular expressions,
  • Searches whole file, and forward and back, and with wrap,
  • Can search a whole project, or across multiple projects,
  • Results are clear and easy to read,
  • It highlights ALL matches so you can find them easily,
  • Highlights as you type:

Here I am looking for the letters “us”. I’ve not pressed return yet, it highlights as I type :-)

Image of search

Now “user_”

Image of search

Now “user_id”

Image of search

And as I said, you can search across a project, when you do you get this results window, which unlike eclipse, puts the FORWARD and BACK arrows, next to the results, not on some totally random part of the page, meaning a lot of useless mouse travel. It’s like netbeans got someone to do a report on all the cack features of eclipse, and started from there…

The search dialogue:

Image of search

And the results:

Image of search

I’ve put so many pics in here, just take my word for it that it highlights the search matches in the document.


Macros

These are a great feature – you can record all sorts of behaviours, including search and replace with regexs, and bundle them up in a macro which can be repeated over and over again.

I found this really useful when dealing with a load of csv text that needed putting into sql and would’ve been quite a pain to do in ruby, but with the macros was really easy. I’m sure this would have lots of other uses too.
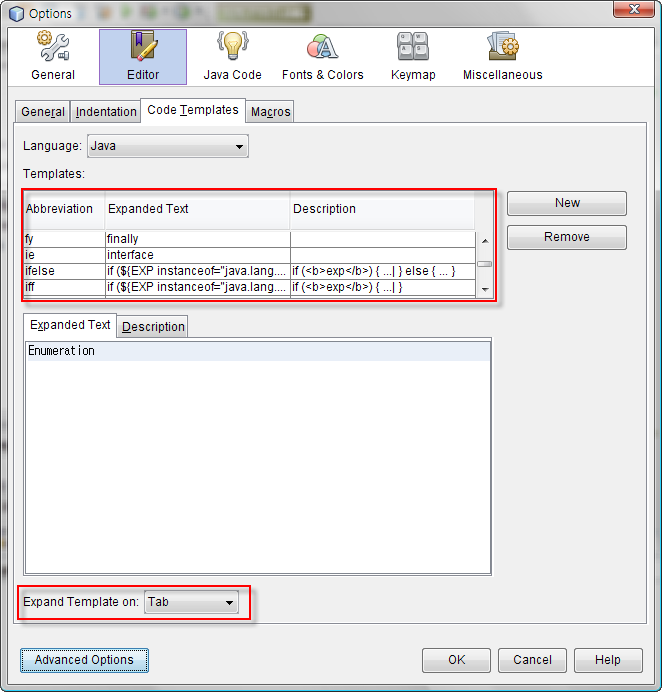


Code templates

These are great! It’s like in textmate where you type a couple of characters and press tab.. E.g. If I’m in an rhtml file and type r and press TAB I get:

<% %> with my cursor flashing away in the middle of it, so I can start typing straight away:

re and TAB:

<%= %> Again with my cursor in the right place table and TAB

They’re great, and you can configure your own so easily, and if you follow conventions, the default values are very useful – you can of course change them, just by tabbing to each one. A very powerful, and useful feature that saves a lot of time.
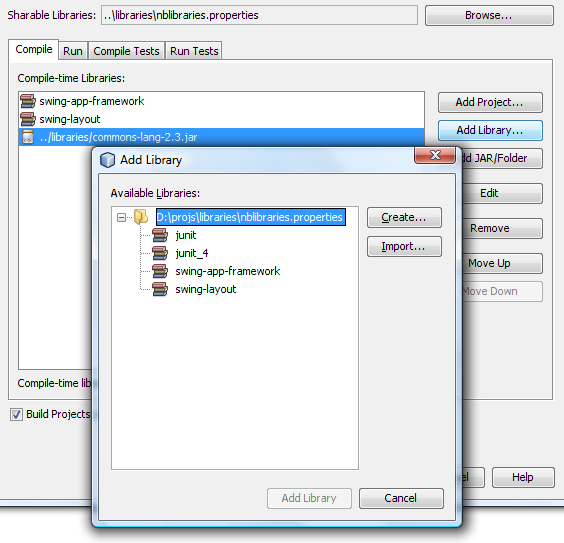
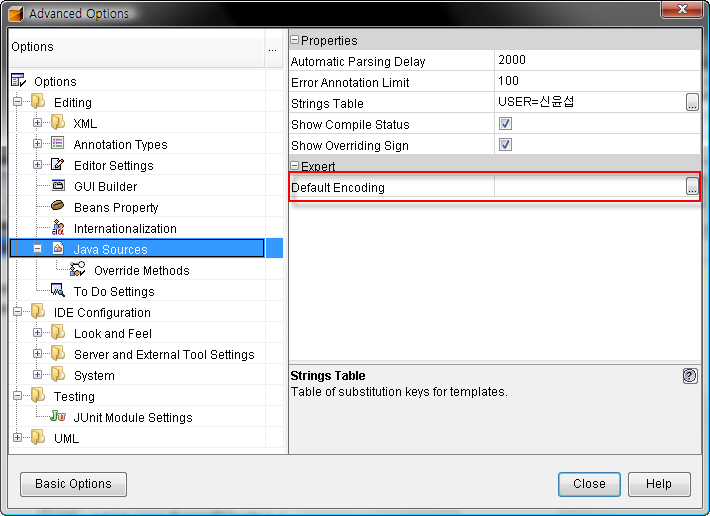
Image of templates


Easy to configure

I wont go showing you pics here, because it will take me aeons but you can configure:

  • keyboard shortcuts,
  • tips,
  • which ruby installation to use,
  • colours,
  • indentation,
  • code templates,
  • which tool tips to use,
  • just about anything you want – really easily and logically.


Jump straight to any file:

I forgot this, it’s my favourite feature probably: On a mac, I press CTRL + SHIFT + O and I get this box:

Image of goto file

I start typing the name of a file:

Image of goto file

Here’s another example:

Image of goto file

Once you find your match, just press return and it opens the file.


Friendly tab switching:

On a mac, I press CTRL + TAB, and I get this dialogue, I can tab back and forth between 2 tabs (as in open documents), or I can keep my finger on CTRL and keep pressing CTRL, or SHIFT and tab to cycle to the document I need.

Image of tab switching


Friendly shortcut keys to get to access different parts of the ide

  • Pressing APPLE 0 focuses on the code window,
  • Pressing APPLE 1 shows/hides the project window,
  • Pressing APPLE 2 shows/hides the files window,
  • Pressing APPLE 4 shows/hides the output window,

This is really useful and makes a lot of workflow’s possible.

I like to have my public folder, config and my db migrations open in the files view, and the ruby-centric files, like rjs, rhtml and rb stuff in my project folder, I can then apple 1 and 2 between them.

I also use apple 4 like it’s going out of style.. I can clear the window easily with APPLE and L then click around on my app in a web browser, come back to netbeans, press APPLE 4, and view the log – clicking on any errors takes me straight to the code.


It’s stable:

I’ve been through many versions of netbeans now -it’s still in beta, and some of them have had me banging my head. However, it’s solid now. You get the odd null pointer exception, but it wont fall over, and you wont lose work. I probably get some kind of anomaly like that once every few days – it’s not crashed on me in over a month of every day use.


Conclusion

I know I sounded like a whiney bitch earlier, but the truth is I don’t know of any other ide that has the feature set of netbeans when it comes to ruby on rails support. And even when one of its’ competitors has similar features, you can just guarantee that netbeans absolutely wipes the floor with it, in terms of implementation and ease of use.

There is no better rails ide, imho

I can’t say about text editors though, but really, if you’re just after an editor, well why the hell did you read this article? ;-) Get yourself textmate or a windows/linux equivalent (in fact, ditch windows and get textmate on mac, or a linux equivalent).

I could write this much about netbeans’ great features over again, btw – this isn’t an exhaustive appraisal – it’s just it’s bank holiday, and I got some other geeky fun I need to go have.

This is probably far too long an article, maybe I’ll split it up – I don’t expect anyone to use it as a reference, I just wanted to shout out about netbeans and all the hard work they’ve been putting in over there, especially Tor Norbye who’s been doing such an excellent job – he’s actually made an engine which may see netbeans supporting even more duck-typed languages in the future.

If you read this far, then thanks for reading. However, please, if you wanna be rude or a fanboy, go do it on digg – if on the other hand, you’ve got any constructive criticism, or any views on the whole netbeans and radrails debate, leave a comment.

However, I think you should just download it for yourself – if you want a ruby ide, I don’t think you can do better – and the I’m just gutted that I can’t edit actionscript in netbeans, because if I could I would.

Though – BE WARNED! After using netbeans 6, you will most likely not want to go back to eclipse and especially radrails.

http://test.lifeonrails.org/2007/8/30/netbeans-the-best-ruby-on-rails-ide

2007/11/23 13:27 2007/11/23 13:27
Trackback Address:이 글에는 트랙백을 보낼 수 없습니다

Web을 통한 넷빈즈 update center / plugin manager 에 접근 하는 방법.

넷빈즈에서 플러그인을 얻기에 가장 쉬운 방법은 넷빈즈 5.X 버전의 '업데이트 센터'나 6.X의 '플러그인 매니저' 를 통하는 방법일 것이다.
하지만, 특수한 경우 - 방화벽 등의 이유로 - 이 기능을 사용할 수 없게 되는데 이런 경우 웹을 통해 플러그인을 다운도르 받을 수 있다.

http://www.netbeans.info/uc/show_uc_content.html

위 URL을 방문하면 아래와 같은 플러그인 인스펙터 화면을 볼 수 있다.

사용자 삽입 이미지
사용자 삽입 이미지

여기서 사용하고 있는 넷빈즈 버전과 타입을 고르면 해당 카테고리의 플러그인 목록이 뜨고 이를 다운로드하여 설치하면 된다.
2007/11/12 12:50 2007/11/12 12:50
Trackback Address:이 글에는 트랙백을 보낼 수 없습니다

넷빈즈에서 루비 에디팅 하기 :: NetBeans Ruby Editing

넷빈즈 6.0 출시를 앞두고 마이스톤 10까지 발표된 현재, netbeans.org에 넷빈즈6.0 와 JDK6.0에 포함 되는 루비에 대해 넷빈즈에서는 어떻게 지원이 되고 있는지에 대한 기사가 올라 왔습니다.
기사 내용을 보면 일반적인 IDE의 에디터가 제공하는 거의 모든 기능을 제공하고 있는 듯 합니다.


Syntax Highlighting

Lexical scanning is done with JRuby's scanner, which identifies elements like global variables and instance variables. As in the Java editor, fields are shown in green. The editor also recognizes Ruby's identifiers, so double clicking in the editor to select the symbol under the mouse pointer includes non-Java identifier characters like @, $, and so on.

Note: You can change the font used in the editor by choosing Tools > Options > Fonts and Colors. In this Options dialog box, by default the Syntax tab and the Default category are selected. Change the font for the Default category to change the font in the editor.

Navigation Display

The Navigator window displays the structure of the file from modules down to individual methods, fields and attributes. Double-clicking an element in the Navigator window, shown in the figure below, displays its source in the editor.

Figure 1: Navigator Window

The structure analyzer is aware of Ruby constructs. For example, attr, attr_accessor, attr_reader, and module_function will properly construct fields, singleton methods, and so on that are included in navigation and code completion.

The Filters buttons at the bottom of the window enable you to filter out private methods, fields, and so on.

Code Folding

Modules, classes and methods can be folded, as shown in the next figure.

Figure 2: Code Folding

Background Error Parsing

The JRuby parser is run in the background when the user stops typing. It provides error messages as error annotations. On a successful parse, the parse tree is used to drive additional features. (And in the future, JRuby will hopefully provide partial parse trees even on erroneous Ruby files.)

Figure 3: Error Annotation

Semantic Syntax Highlighting

This feature identifies method calls and definitions, parameters, and unused variables.

Figure 4: Semantic Syntax Highlighting

Mark Occurrences

Positioning the edit cursor on an element (such as a local variable, dynamic variable, instance variable, global variable, method call, or class reference) highlights all other references as well as redefinitions of the current symbol.

The first example shows how parameters are highlighted when you position the cursor on one of them:

Figure 5: Highlighted Parameters

The next figure shows method calls and method definitions that are highlighted when the cursor is positioned on the second method from the bottom. The editor uses method arity to select which of the overloaded methods apply.

Figure 6:  Highlighted Methods
Figure 6: Highlighted Methods

There is additional highlighting behavior. If you place the cursor on a method definition, the editor highlights all the potential exit points - the last statement of the method as well as any return, yield, raise, or fail statements.

Go To Declaration

If you right-click an element and choose Go To > Declaration, the editor will go to the declaration for the element if possible. If you hold down the Ctrl key (or the Command key on the Macintosh) and drag the mouse pointer over the source code, identifiers are highlighted as hyperlinks. Clicking a hyperlink goes to its declaration if possible.

Figure 7: Ctrl-Drag Shows Go To Declaration Hyperlinks

Figure 7: Ctrl-Drag Shows Go To Declaration Hyperlinks

Note: This feature always works for local variables and dynamic variables, but it is not as reliable for methods, classes, and such because it requires the type inference engine as well as some other facilities for finding references in the built-in libraries.

Instant Rename

Renaming a local or dynamic variable is done in place, and all references are updated on the fly. To invoke this feature, right click the element and chose Instant Rename, or press Ctrl-R on Microsoft Windows systems or Command-R on Macintosh systems. All instances to be renamed are selected, as shown in the figure below, and when you type the new name, all are updated.

Figure 8: Instant Rename

Figure 8: Instant Rename

Code Completion

Some basic code completion is provided. As you are typing, if you press Ctrl-Space, completion is provided for local variables and dynamic variables in the current block, as well as method names, class names, and constants in the same file. In addition, various Ruby built-ins, such as keywords and predefined constants, are provided.

If you try code completion on any complicated arbitrary expression, it will show you a number of possible method completions along with the corresponding class, as shown in the following figure. This feature gives you much the same information as ri, the Ruby Interactive Reference.

Figure 9: Code Completion:

Figure 9: Code Completion: All Matches

In many contexts, you know the exact type. For example, if you type File.c and invoke code completion, the editor shows you only the singleton methods of class File that start with c, as well as inherited methods and module mixins.

Figure 10: Code Completion: Singleton

Figure 10: Code Completion: Singleton

In some cases, the editor can detect that it is dealing with an instance of an object, so it has more information than just the class. In that case, it can show all the instance methods too, not just the class methods.

In the following figure, code completion is being applied to a regular expression literal. Code completion works for all kinds of literals in your code: strings, regular expressions, arrays, hashes, symbols, numbers, and so on, and you can even use it with the nil keyword. For example, with arrays, try code completion with [1,2,3].e to see the each method and its documentation.

Figure 11: Code Completion: Instance

When there is associated Ruby documentation (rdoc) for a program element, it is displayed in a documentation popup below the code completion window, as you can see in the previous figure. There is also documentation for some built-in keywords that is based on the Ruby spec at http://www.headius.com/rubyspec/index.php/Ruby_Language, as shown for the yield keyword in the next figure.

Figure 12: Code Completion: Keyword Documentation

Code completion also provides help in specific contexts. For example, if you invoke code completion within the string of a require or load statement, you see a list of available imports:

Figure 13: Code Completion: Require Statement

Figure 13: Code Completion: Require Statement


If you invoke code completion while typing a regular expression, you get help with regular expression syntax, as shown in the following figure.

Figure 14: Code Completion: Regular Expression

If you're typing Ruby code and can't remember the names or meanings of dollar variables or what the escape codes are following a percent sign, use code completion as shown in the following two figures.

Figure 15: Code Completion: Dollar Variable

Figure 16: Code Completion: Dollar Variable
Figure 16: Code Completion: Percent Symbol

There are more scenarios. For example, invoking code completion after a def keyword lists only the inherited methods from the superclasses. For more applications of code completion, see Tor Norbye's blog Ruby Screenshot of the Week #10: Taking Up The Gauntlet.

Pair Matching

The editor automatically highlights matching parentheses (), braces {}, brackets [], string delimiters " ', regular expression delimiters %r{}, and so on. In addition, as you're editing, the editor tries to automatically insert and remove matching delimiters automatically without getting in the way. For example, if you type %x{, the editor modifies the document to contain %x{|}, and if you then type the closing }, it removes the previously added } so the document contains only one closing brace. The important part here is that while you're editing, the file stays valid so that code completion and similar features will work.

Pair Matching works on blocks as well. If you type for something or def (something) and press Enter, the editor automatically adds an end statement for you if one is needed, inserts a line above it, and positions the cursor on that line. The feature works similarly for closing braces in blocks. It also works on =begin/=end pairs. If you type =begin and press Enter, the editor automatically adds =end for you if it is needed. Additionally, if you put the cursor on an end statement, the editor highlights the statement that began the block.

Figure 18: Matching End to Beginnning of a Block
Figure 18: Matching End to Beginning of a Block

Smart Indent

Pressing Enter to create a new line causes the new line to be indented appropriately, either with the same indent as the previous line or further indented if establishing a new block, such as with an if statement or case statement

Smart indent also works in other cases. For example, if you type end at the beginning of a line, the editor indents the line to align the end with the corresponding opening statement, such as class, def, for, and so on. If you continue typing more characters after end (for example, end is the first three characters of endiandCheck()), the line is indented to its original position immediately.

Figure 17: Smart Indent

Smart Selection

If you press Alt-Shift-Up Arrow or Alt-Shift-Down Arrow on a Microsoft Windows machine or Ctrl-Shift-Up Arrow/Down Arrow on a Macintosh, the editor selects progressively larger (Up Arrow) or smaller (Down Arrow) code blocks around the cursor. For example, if you're in a for block that is inside an if block, on the first press of Alt-Shift-Up Arrow, the for block is selected, then on subsequent key presses the surrounding if block is selected, then the method definition, then the class, then the module. In a comment, first the line is selected, then the whole comment block, then whatever logical code block surrounds the comment.

Formatting

The Reformat Code command reformats the source code by using the same line indenting logic that Smart Indent uses. To automatically reformat your code, right-click and choose Reformat Code, or press Ctrl-Shift-F. There is also a Pretty Printer, which will go a bit further in reorganizing code, adding or removing parentheses, and so on. The Pretty Printer is incomplete and is not yet enabled.

RDoc Support and String Support

RDoc is the Ruby Documentation System. In the Ruby Editor, comments containing RDoc tags or directives will show the RDoc directives as highlighted. Similarly, quoted strings will show the escape sequences in bold.

Note: As mentioned previously under Code Completion, if there is rdoc support for an element, you see the rdoc when you display the code completion pop-up. This section discusses code editor support for your rdoc comments in your code, not the rdoc displayed by the editor for code completion.

Figure 23: RDoc Comments and Quoted Strings

Embedded code fragments within String literals and regular expressions are also supported, as shown in the next figure.

Figure 24: Embedded Code Fragment Support in Strings and Regular Expressions

Figure 24
: Embedded Code Fragment Support in Strings and Regular Expressions


원문 출처 : http://www.netbeans.org/kb/60/ruby-editing.html
2007/07/10 18:21 2007/07/10 18:21
Trackback Address:이 글에는 트랙백을 보낼 수 없습니다